
Openshift and Event Driven Ansible (Part 1)
In this series of posts, I will be covering the basics of setting up Ansible Automation Platform and the EDA (Event Driven Ansible) custom-resource. An Ansible rulebook and an associated playbook will be run to take an alert from OCP via AlertManager. This alert is received by the Rulebook via a webhook and takes the event variables as some sort of action in a playbook.
Eventually, this code will be used to automatically resize a persistent volume claim but that part is still in the works. Right now, let's just cover the basics for part 1 of this series.
Note: This project is still very much tech preview so things may change but this will give an idea on the power of Event Driven Ansible.
Here is my GitHub repo with some of this code
 kcalliga
Here are the high-level steps that will be detailed in this article. This assumes that Openshift Data Foundations or some other dynamic provisioner is available that serves File-based storage.
A. Installing Ansible Automation Platform Operator
B. Installing Ansible Controller
C. Installing EDA (Event Driven Ansible)
D. Importing Rulebook Via GitHub Repo
E. Importing Playbook Via GitHub Repo
F. Sending Sample.json alert
G. Seeing Output of Alert Processed via Rulebook/Playbook
Installing Ansible Automation Platform Operator
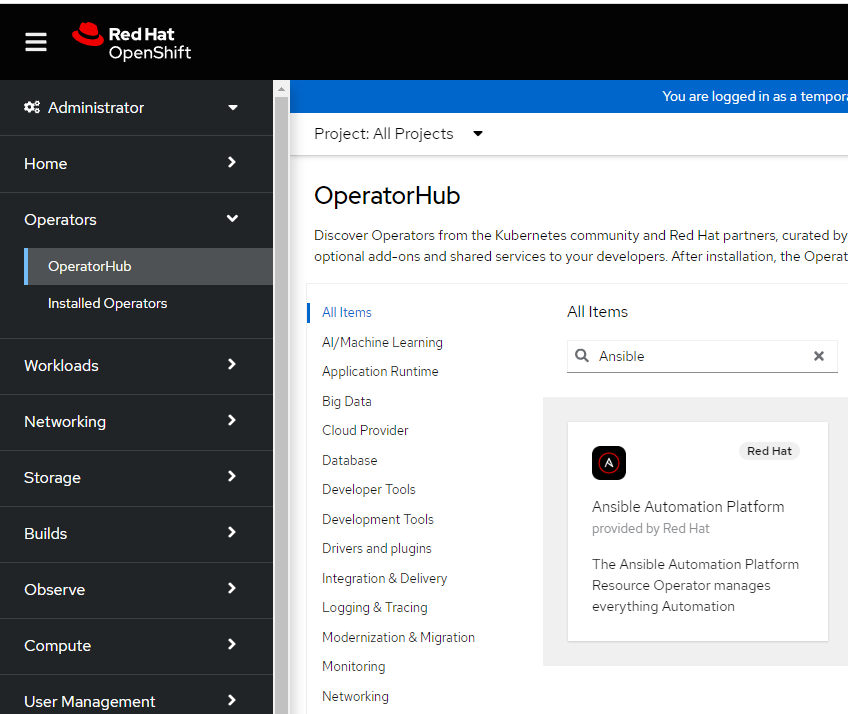
- In the Openshift Web Console under Operators --> OperatorHub, search for Ansible. Click on the "Ansible Automation Platform" operator.
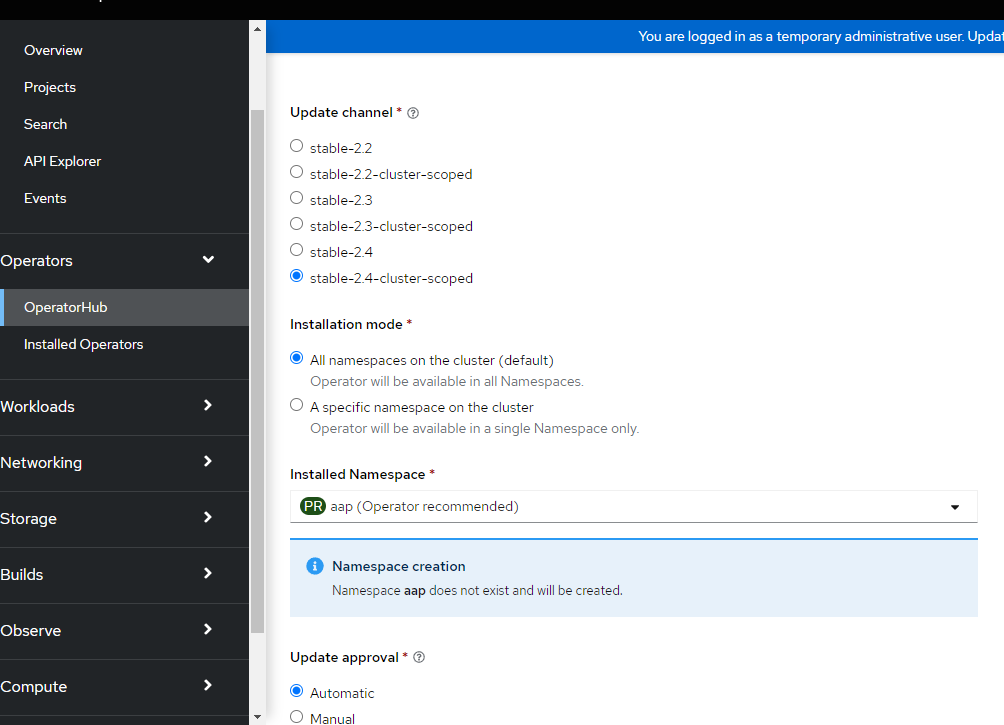
2. Select default settings which is cluster-scoped (2.4 at time of writing) and the creating of a namespace/project called AAP. Click Install.
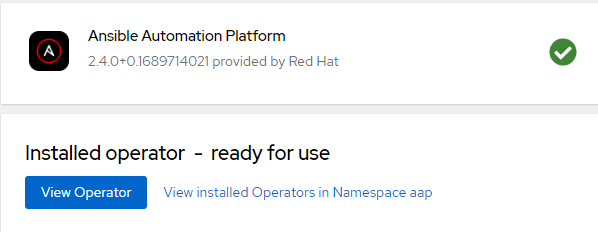
3. Once the Operator is successfully installed, an option to view the Operator will appear.
Installing Ansible Controller
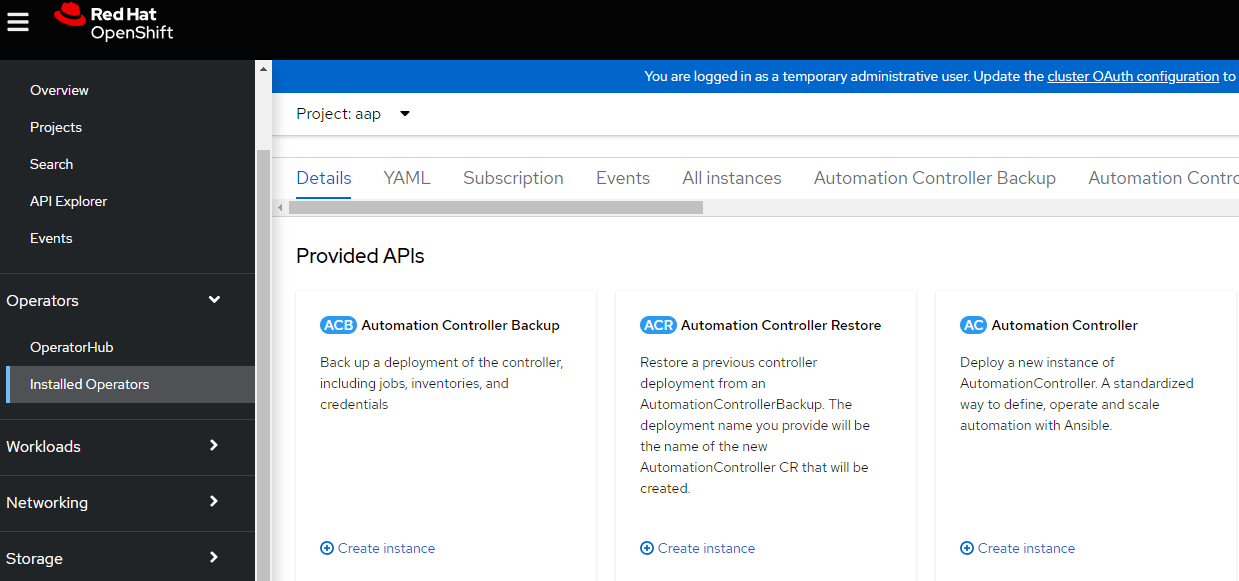
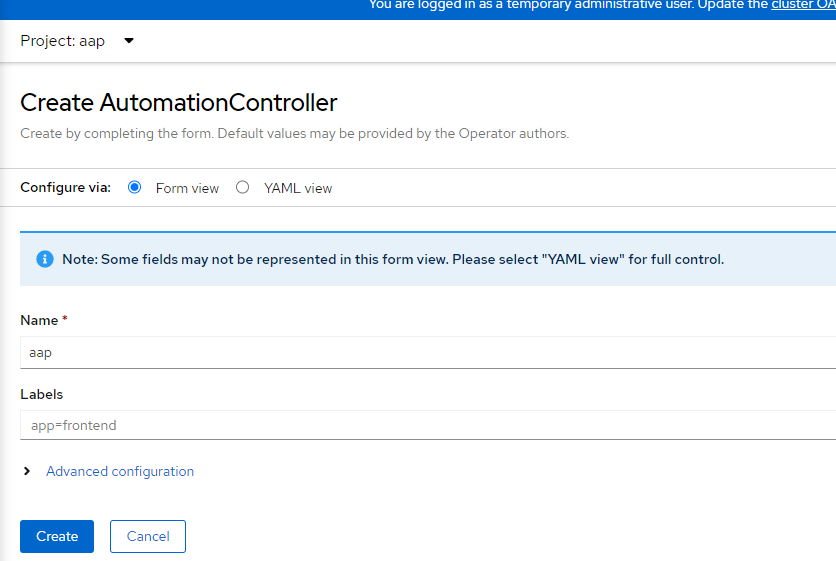
- On the operator details screen, click on "Create Instance" for Ansible Controller.
2. On the resulting screen, type aap for the name of the Ansible Controller. Having unique names for each of these components is critical. Click "Create"
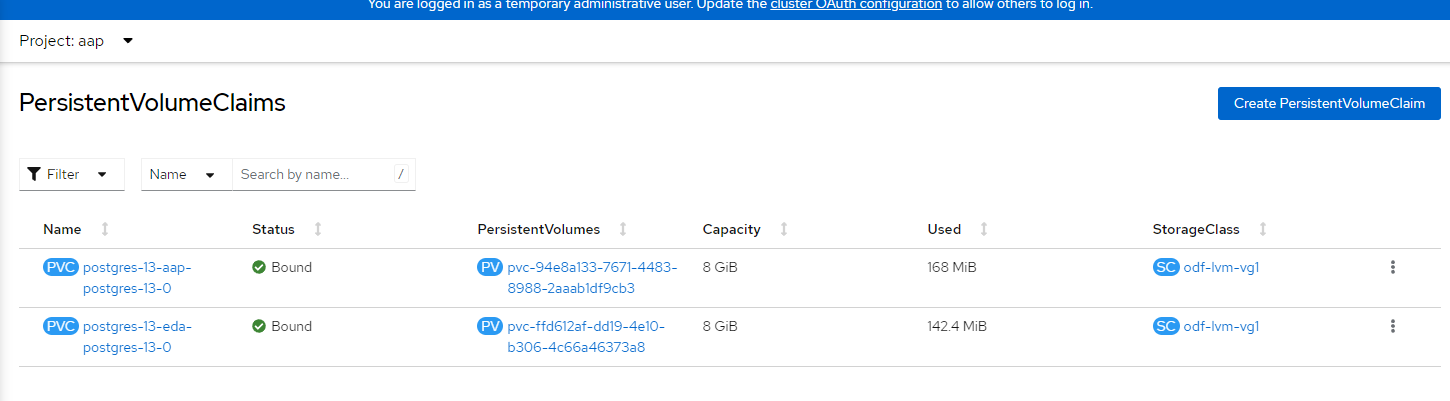
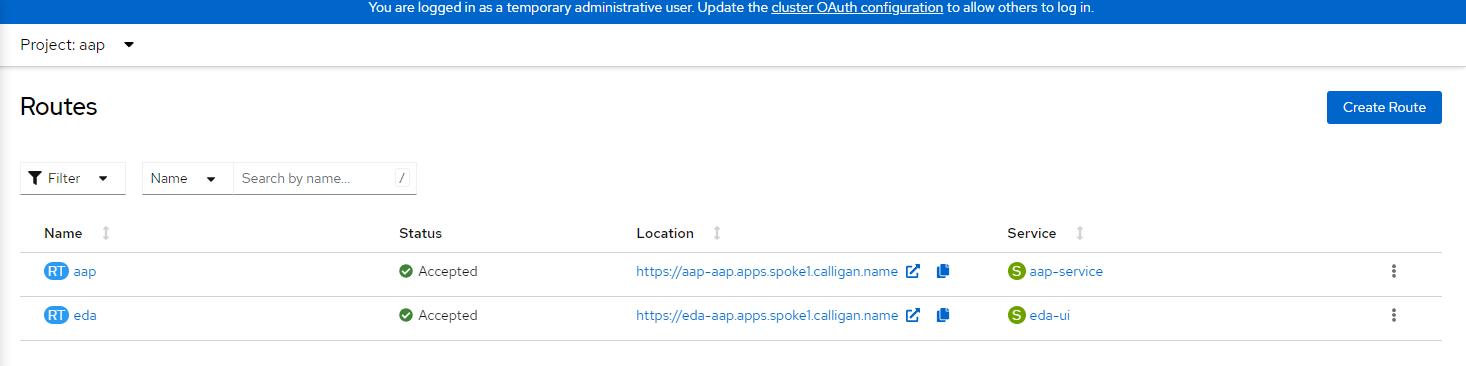
3. To verify successful installation, let's ensure a PVC is created for the postgres database and bound and a route exists for the Ansible Controller. Each of these resources will be in the "AAP" namespace/project.

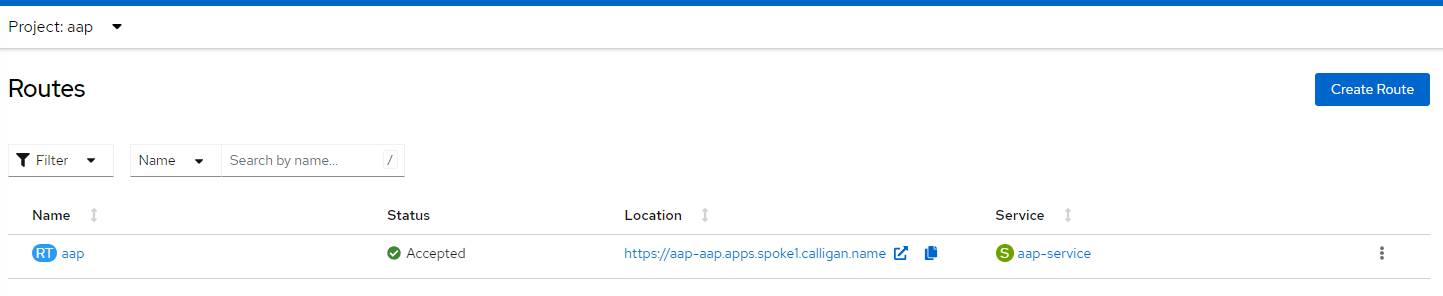
4. To login to AAP, go to the route and type the password that is contained in the aap-admin-password secret.
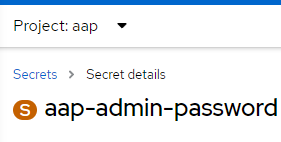
Click Reveal Values to show the password

5. The username is admin and the password is what was obtained above in step 4.

6. When logging in the first-time, you will be taken to a wizard that uses your subscription credentials. I used my Red Hat username/password.

7. Once you type in your Red Hat credentials, click "Get Subscription".
8. On the resulting screen, select the appropriate subscription and click "Next"
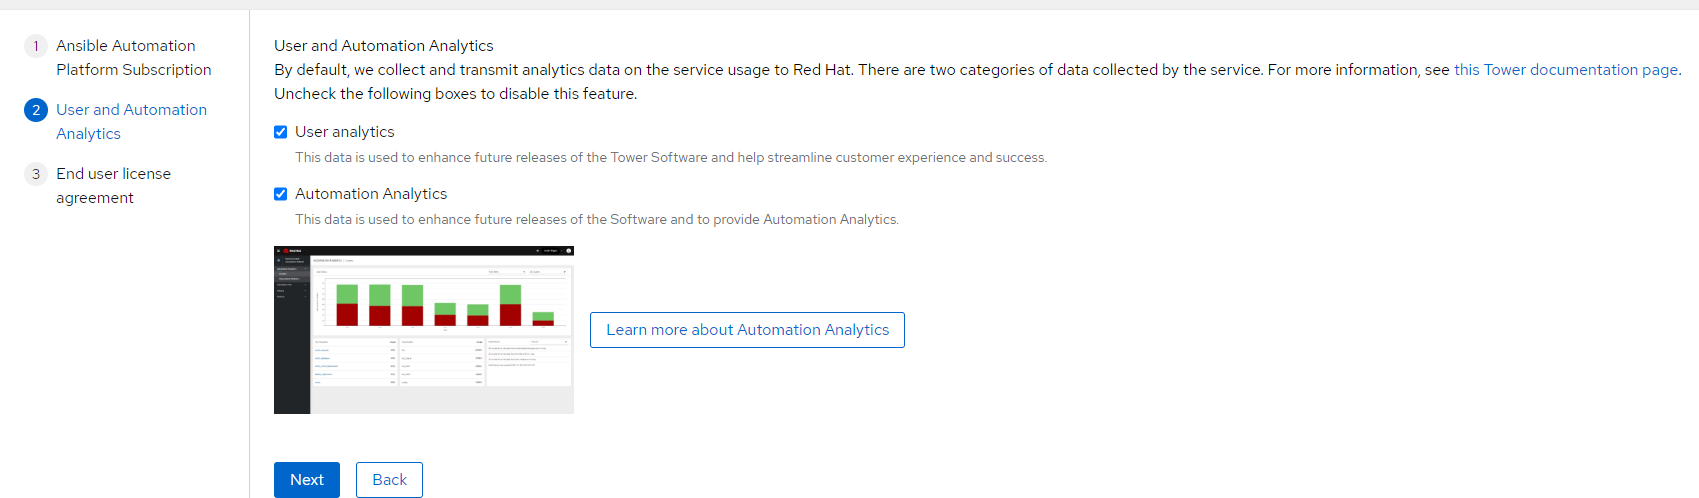
9. On the following screen, you can select whether you want analytics data collected and to accept the agreement.
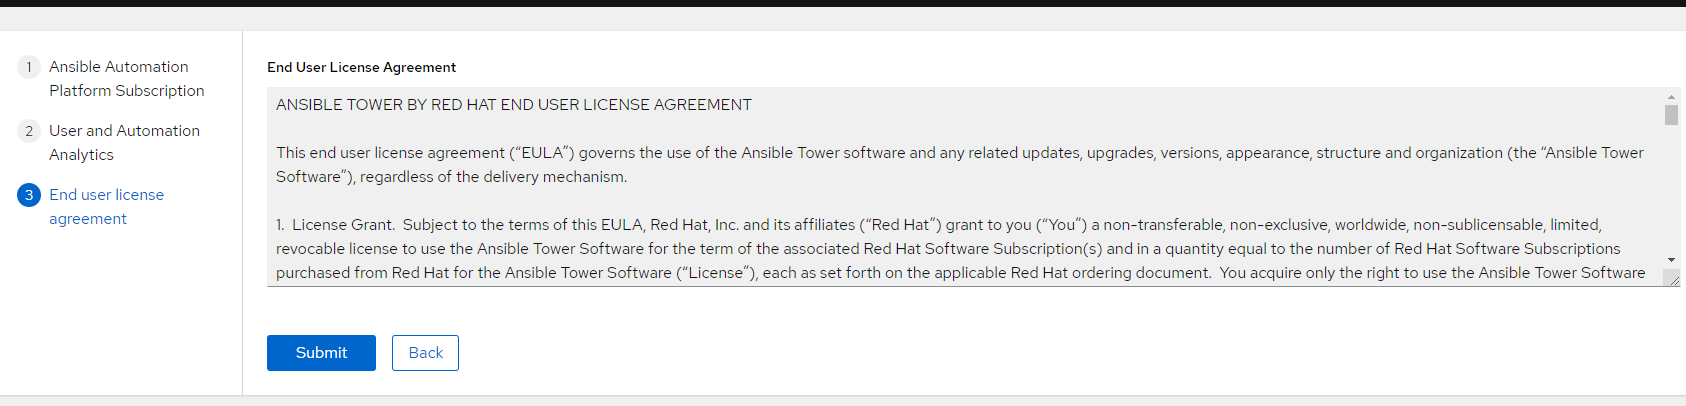
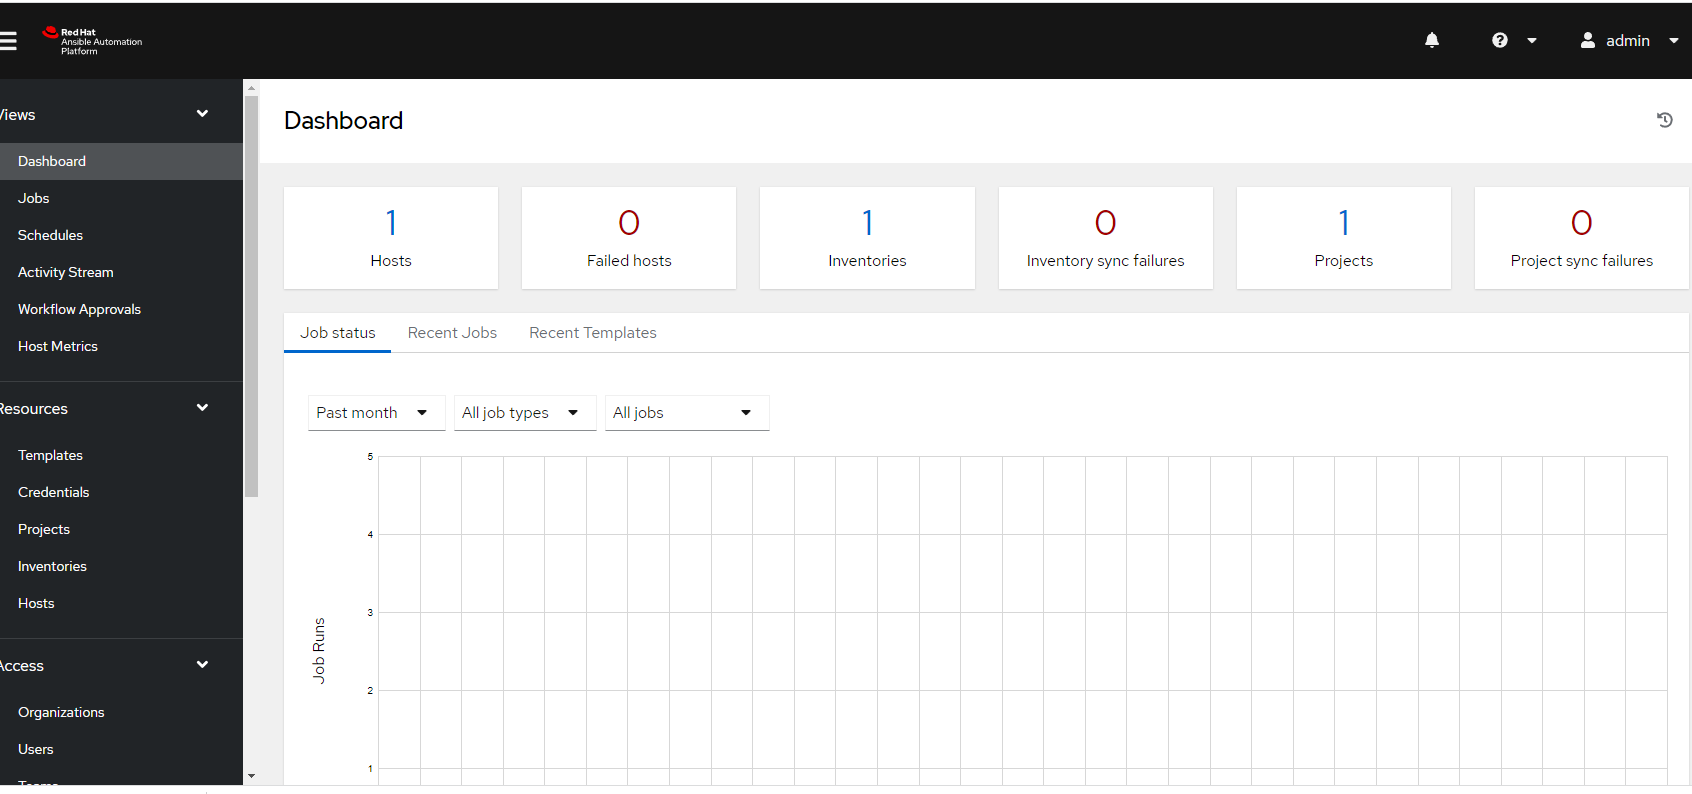
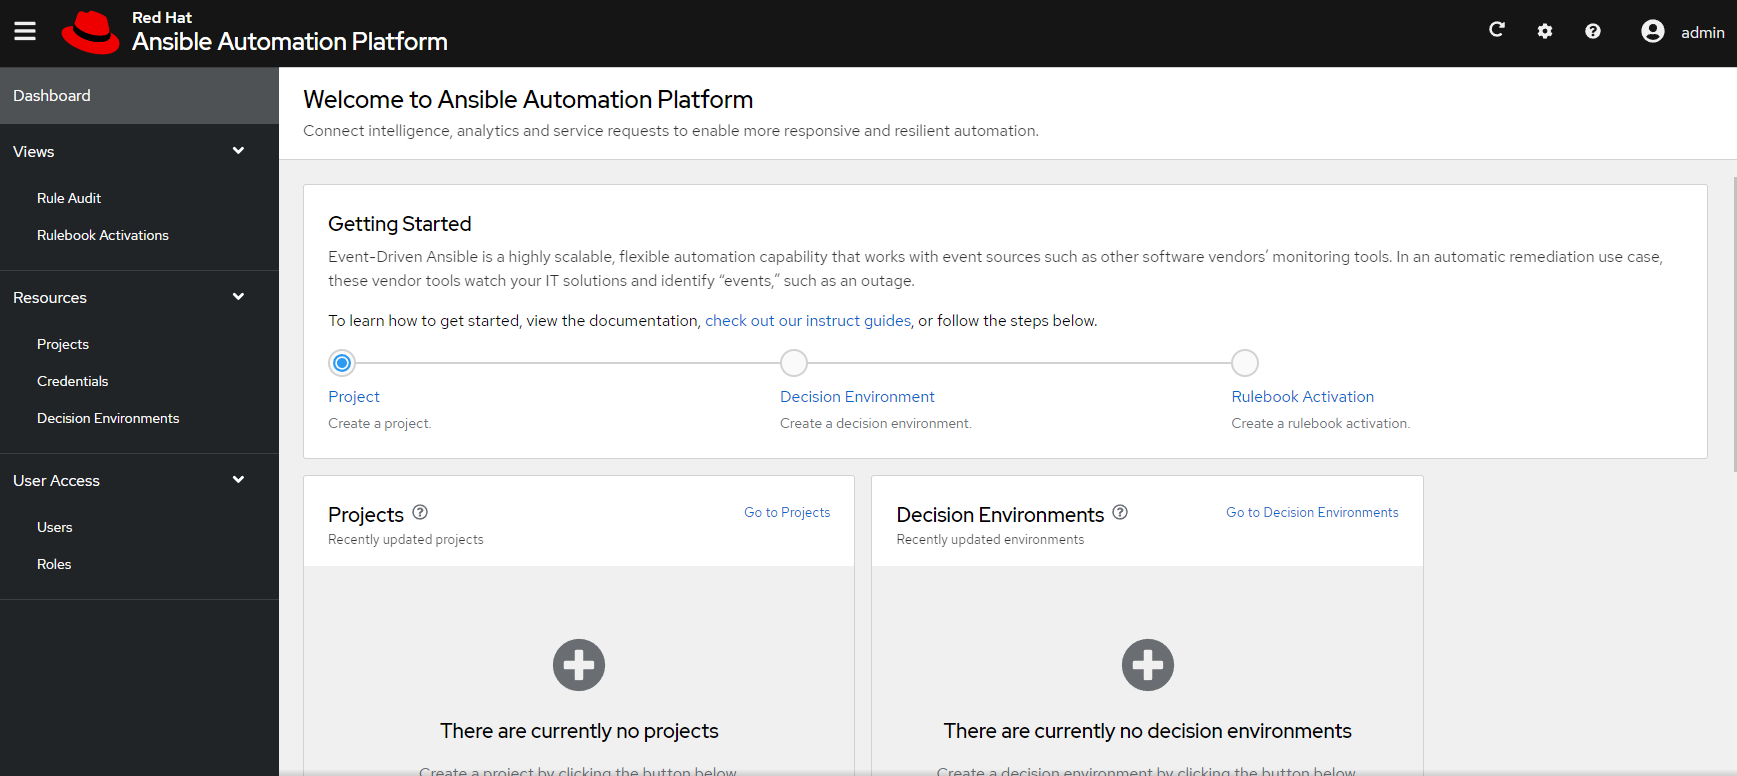
10. After hitting "Submit", the dashboard will appear.
Installing EDA (Event Driven Ansible)
See the official documentation for full details but here is the main highlights.
https://access.redhat.com/documentation/en-us/red_hat_ansible_automation_platform/2.4/html-single/deploying_the_red_hat_ansible_automation_platform_operator_on_openshift_container_platform/index#deploy-eda-controller-on-aap-operator-ocp
- On the OCP Web Console, go back to Installed Operators --> Ansible Automation Platform and create an instance of EDA.
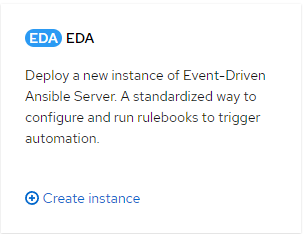
2. On the resulting screen, call the instance eda.
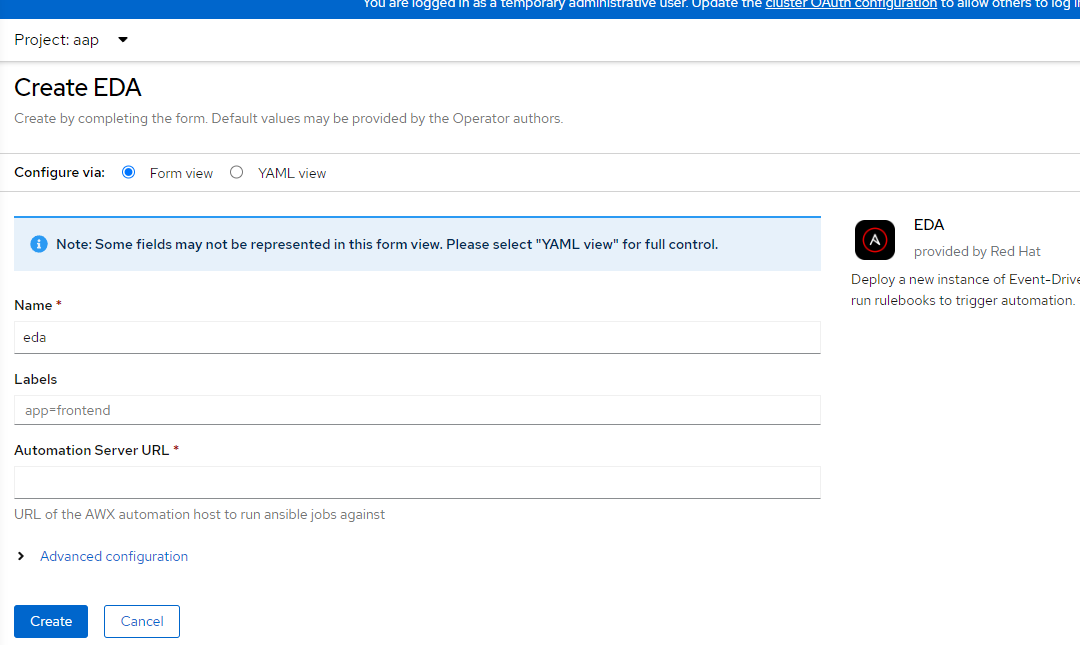
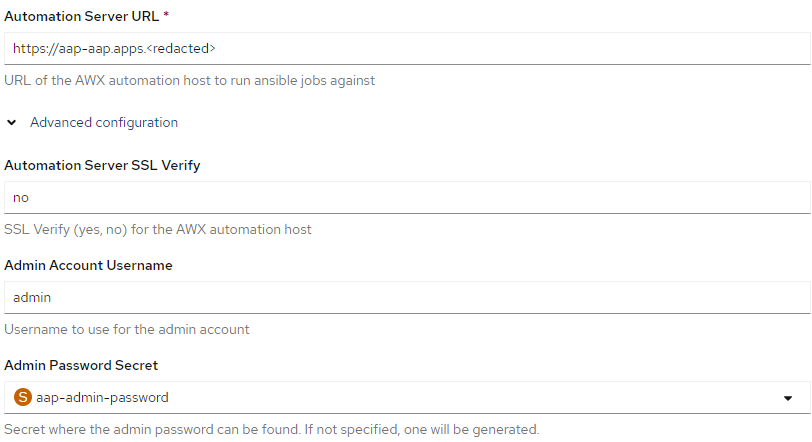
3. Expand the "Advanced Configuration" and type in the URL/route to AAP instance and reference the secret for the aap-admin-password that was created earlier. Also, select "no" for SSL verify (for test purposes).
4. Click "Create"
5. Let's verify that the PVC is bound and a Route is created. You will see two PVCs (one for EDA and another for AAP) and two routes (EDA and AAP).
6. Now, let's get the admin password for EDA GUI. To login to EDA GUI for first-time, use the admin credentials based off of AAP that you obtained earlier.
7. The first-time you login, you will be presented with a screen that will let you setup EDA for the first-time. This is where you can add your project, decision environment, and actions.
8. Create project
My sample repo is located at https://github.com/kcalliga/pvcresize-eda
Use the following values for now in order to link to my repo
Name: resizepvc
Description: resizepvc
SCM Type: Git
SCM URL: https://github.com/kcalliga/pvcresize-eda
Credential: No credential since this is a public repo
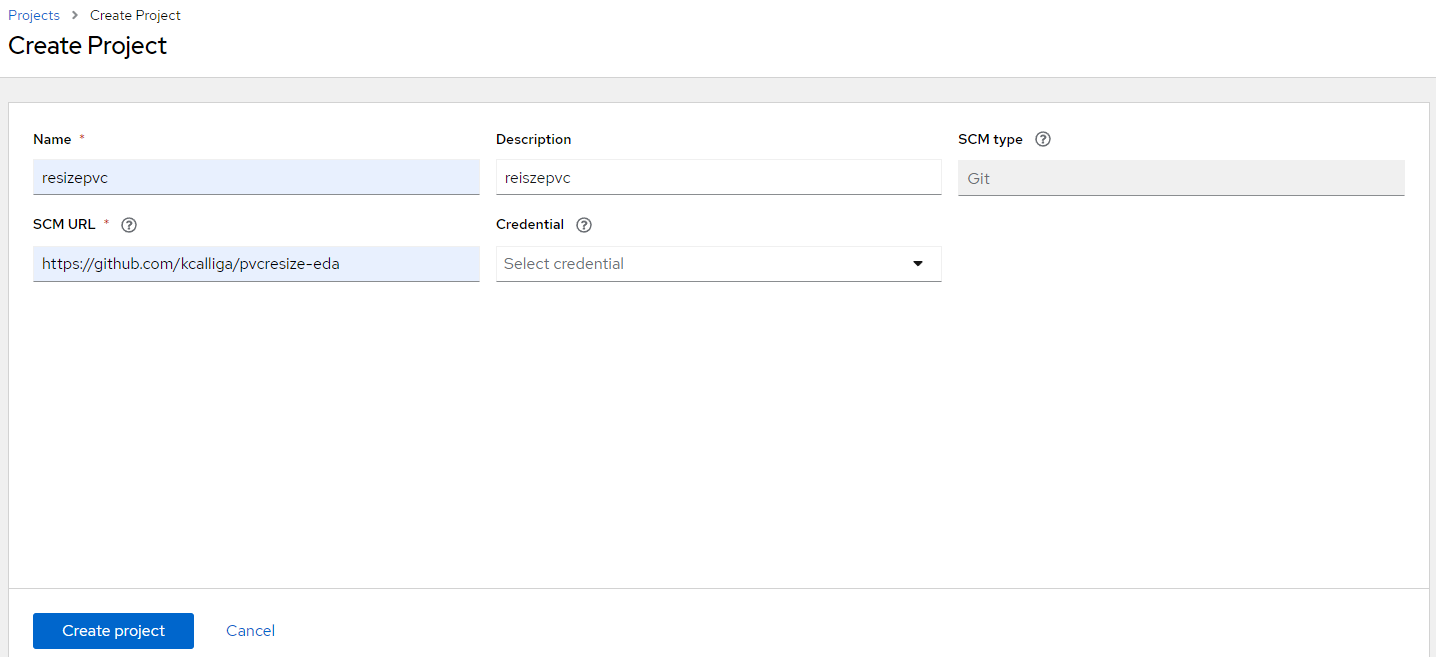
Click "Create Project"
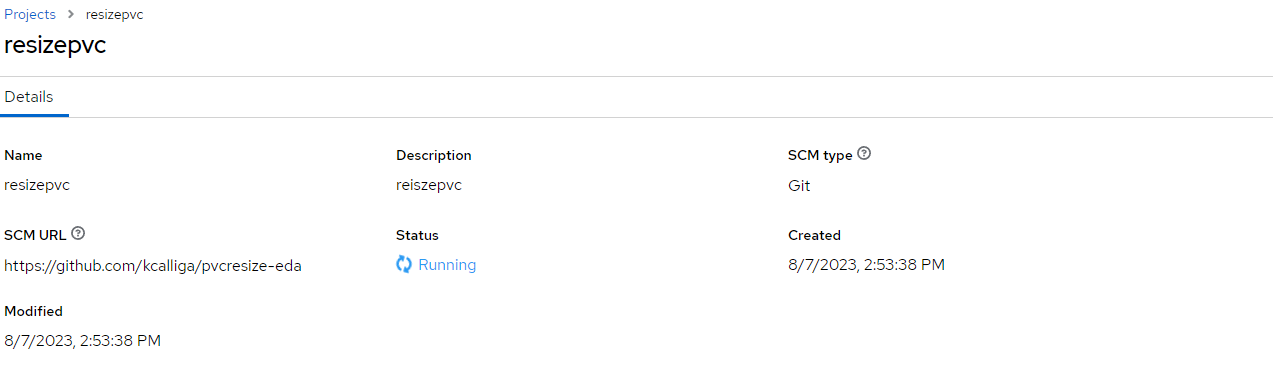
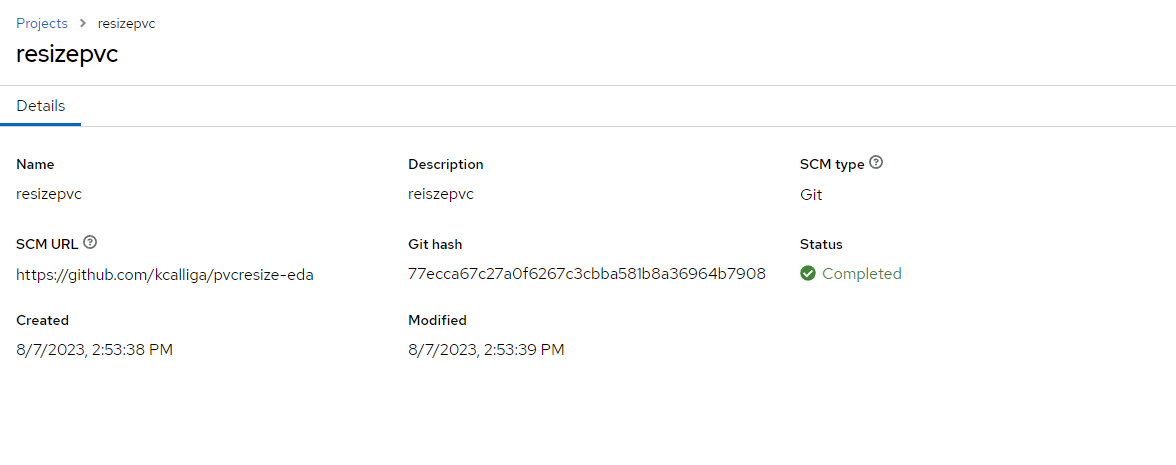
This will sync to my GitHub repo
It will from "Running" state to "Complete"
9. Create Quay registry credentials.
Login to quay.io with your personal credentials.
In the upper-right-hand corner highlight your username --> Account Settings
Click "Generate Encrypted Password"
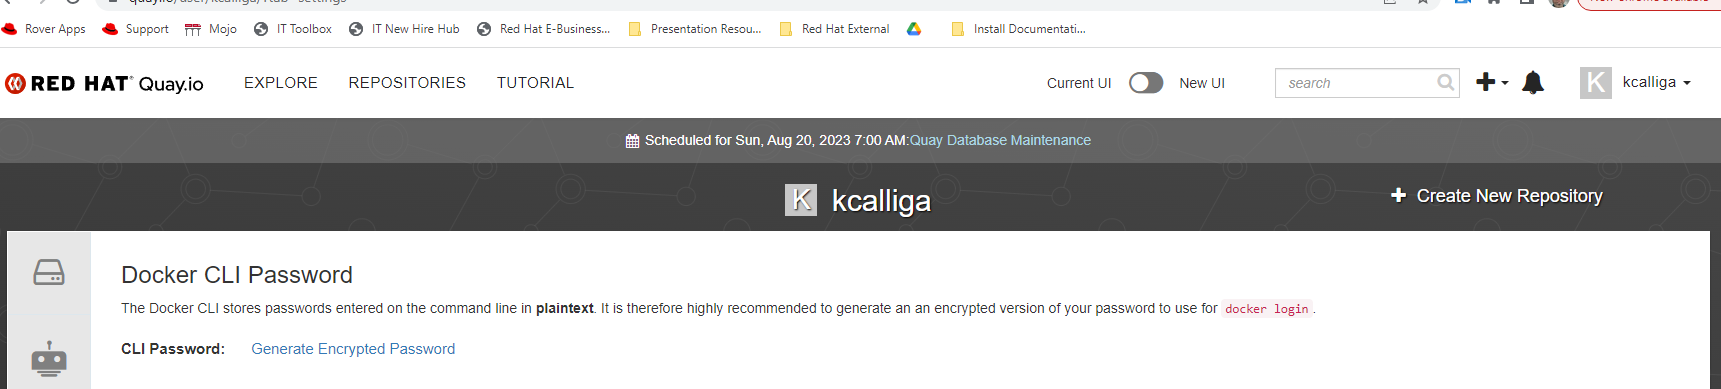
In the output, copy the encrypted password string
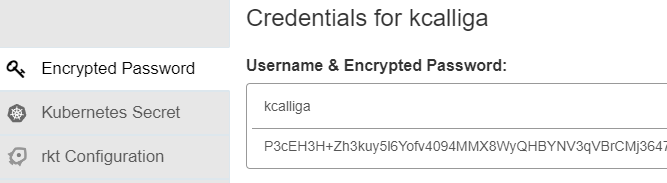
10. In EDA, go to Credentials --> Create Credential
Name: My Quay Credentials
Description: My Quay Credentials
Username: Quay Username
Token: Obtained from step 9 above
9. Create "Decision Environment"
Name: Default
Description: Default Decision Environment
Image: quay.io/repository/ansible/ansible-rulebook:main
Credential: My Quay Credentials
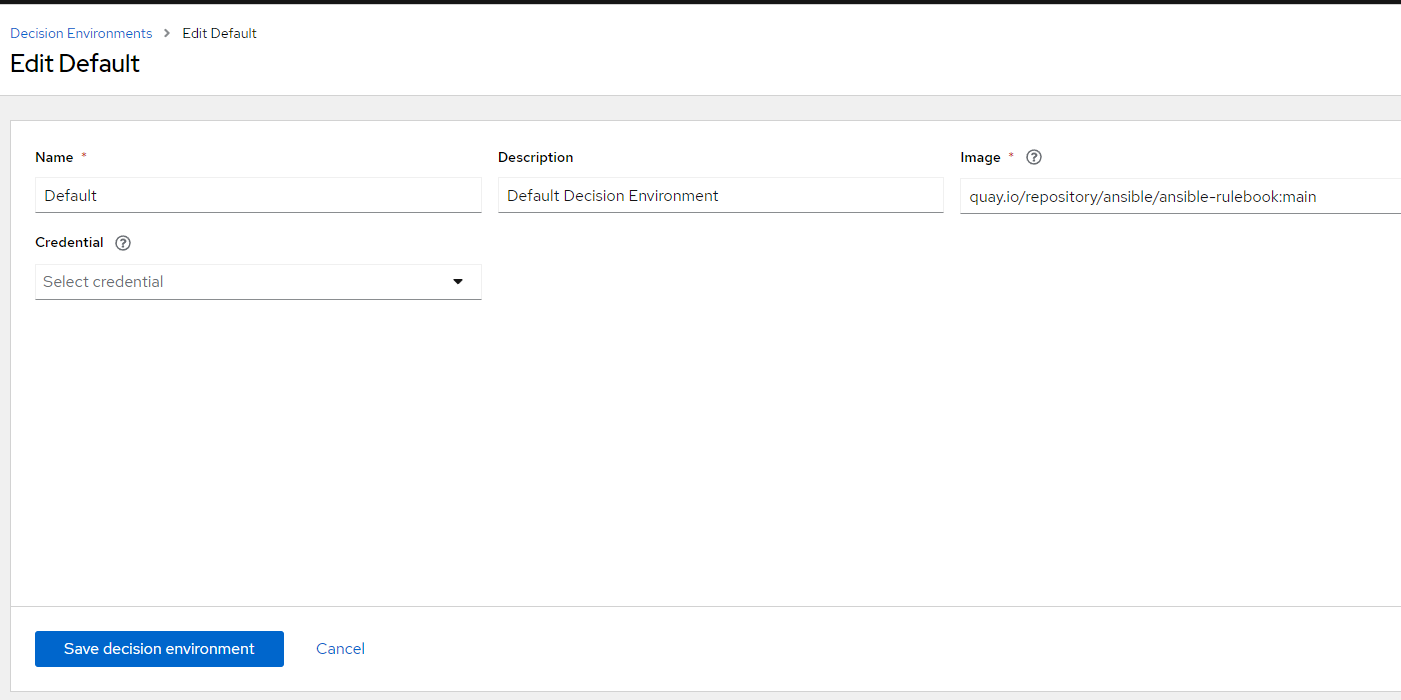
Click "Create Decision Environment"
10. At this point, some tokens/credentials need to be setup in order for EDA to be able to talk to controller.
The steps and code I am using to base some of my examples are from:
https://github.com/kubealex/event-driven-automation
11. On Ansible controller
Go to Administration --> Applications
Click "Add Application"
Name: Personal Access Token
Description: Personal Access Token
Organization: Default
Authorization Grant Type: Resource owner password-based
Client Type: Public
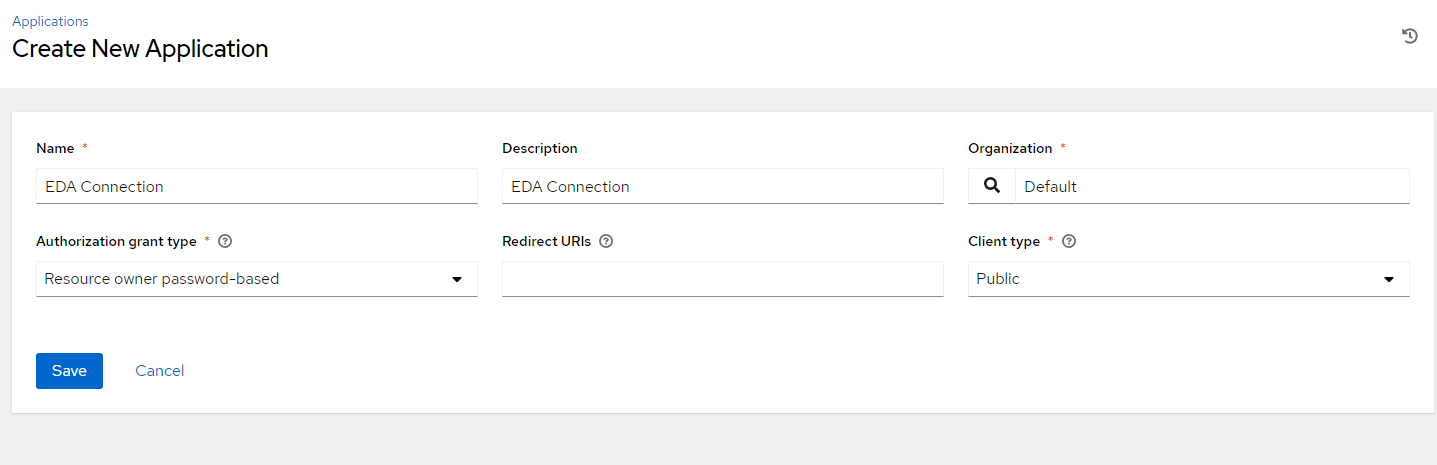
Click "Save". A token will be created.
12. Under Users --> Admin --> Tokens, create a token for this application with Write Access.
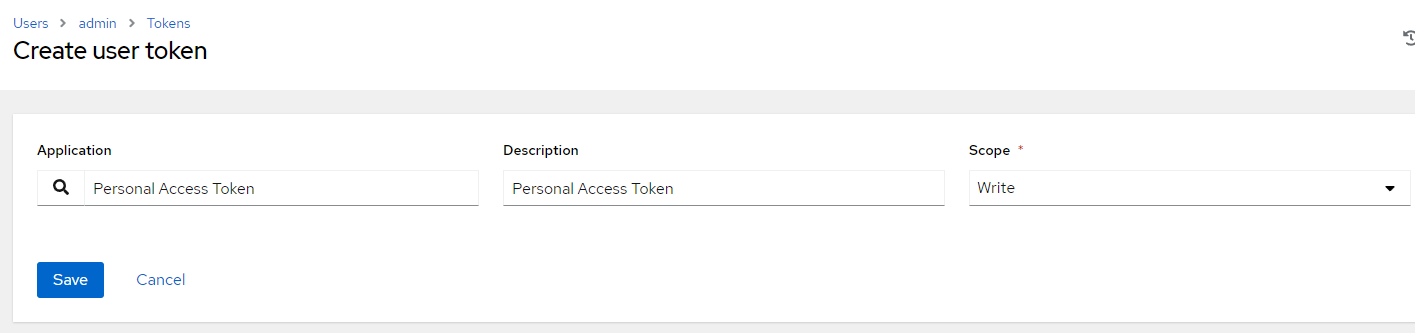
Click "Save". A token and refresh token will be shown. Save this is in a good place (IE: notepad)
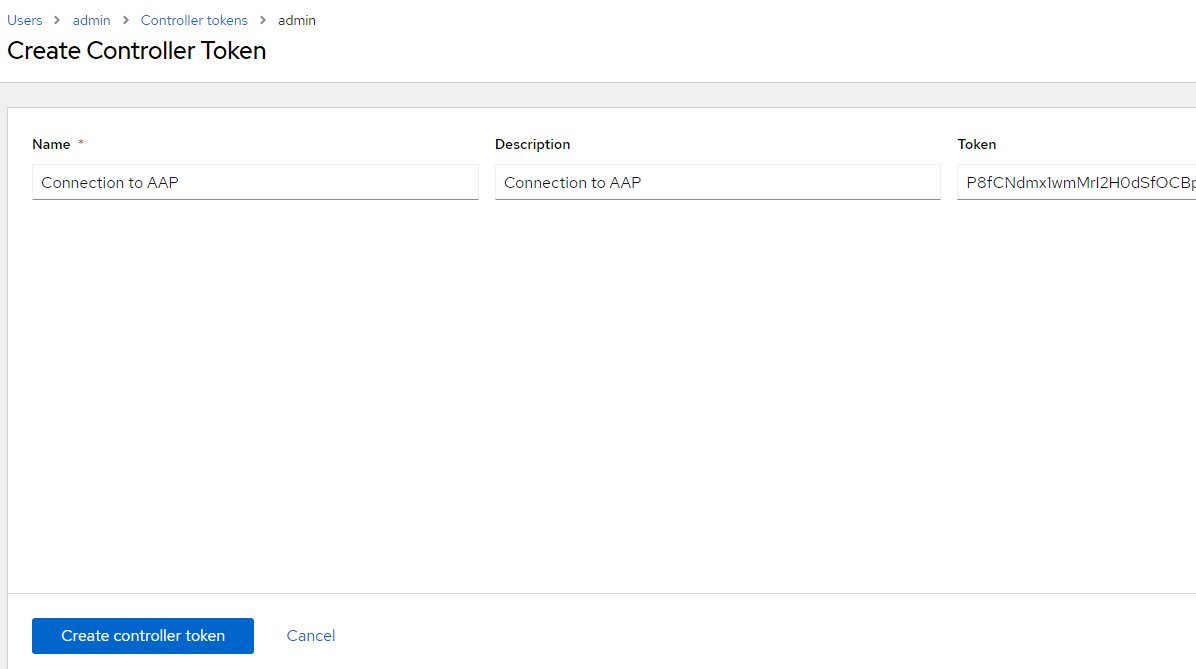
13. On the EDA, go to Users --> Admin --> Controller Tokens.
Click "Add"
Name: Connection to AAP
Desription: Connection to AAP
Token: Copied/pasted from output in step 12.
Importing Rulebook via GitHub Repo
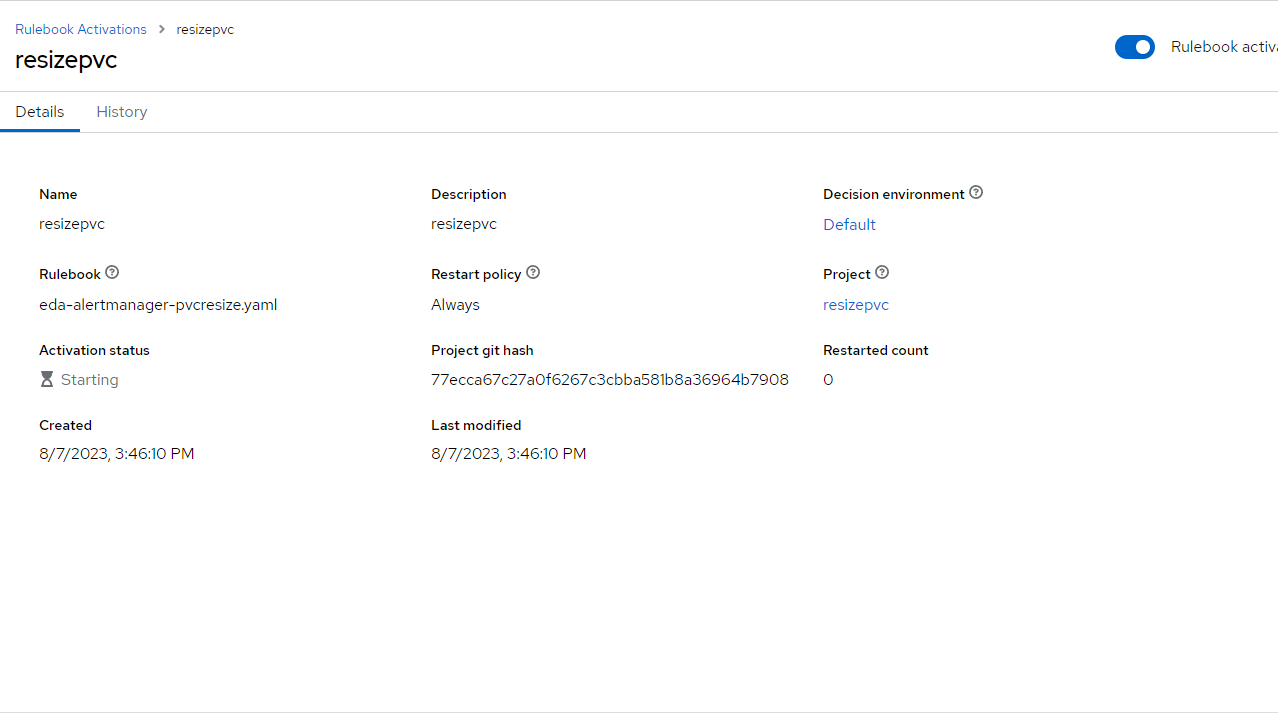
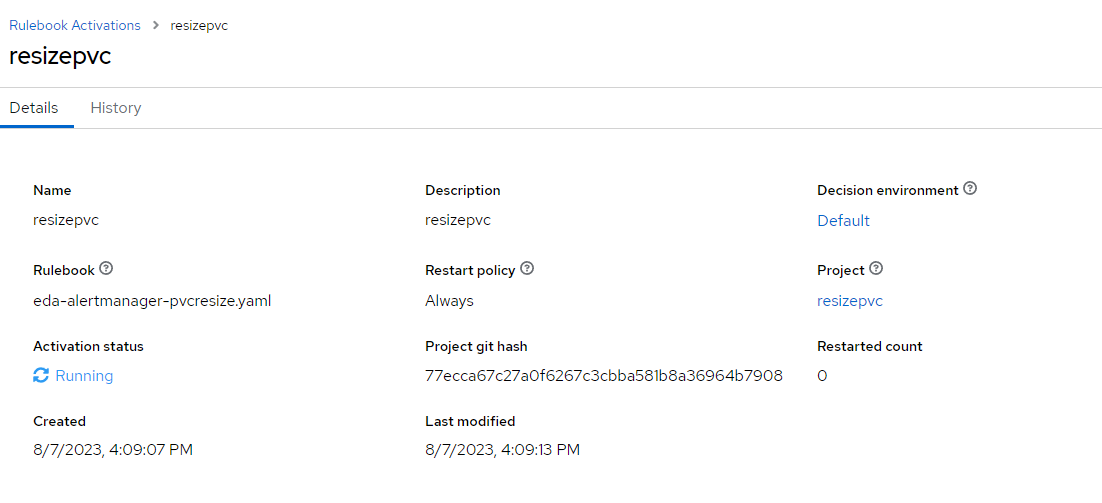
1. Back on EDA, Create "Rulebook Activation"
Name: resizepvc
Description: resizepvc
Project: resizepvc
Rulebook: eda-alertmanager-pvcresize.yaml
Decision Environment: Default

Click "Create Rulebook Activation"
It should go from "Starting" to "Running"
2. This rulebook activation is based on alertmanager source. The code has it listening on port 5001.
See https://github.com/kcalliga/pvcresize-eda/blob/main/rulebooks/eda-alertmanager-pvcresize.yaml for more details
Importing Playbook from GitHub Repo
- On the Ansible Controller, go to Projects --> Add
Name: resizepvc
Description: resizepvc
Organization: Default
Execution Environment: Default
Source Control Type: Git
Source Control URL: https://github.com/kcalliga/pvcresize-eda
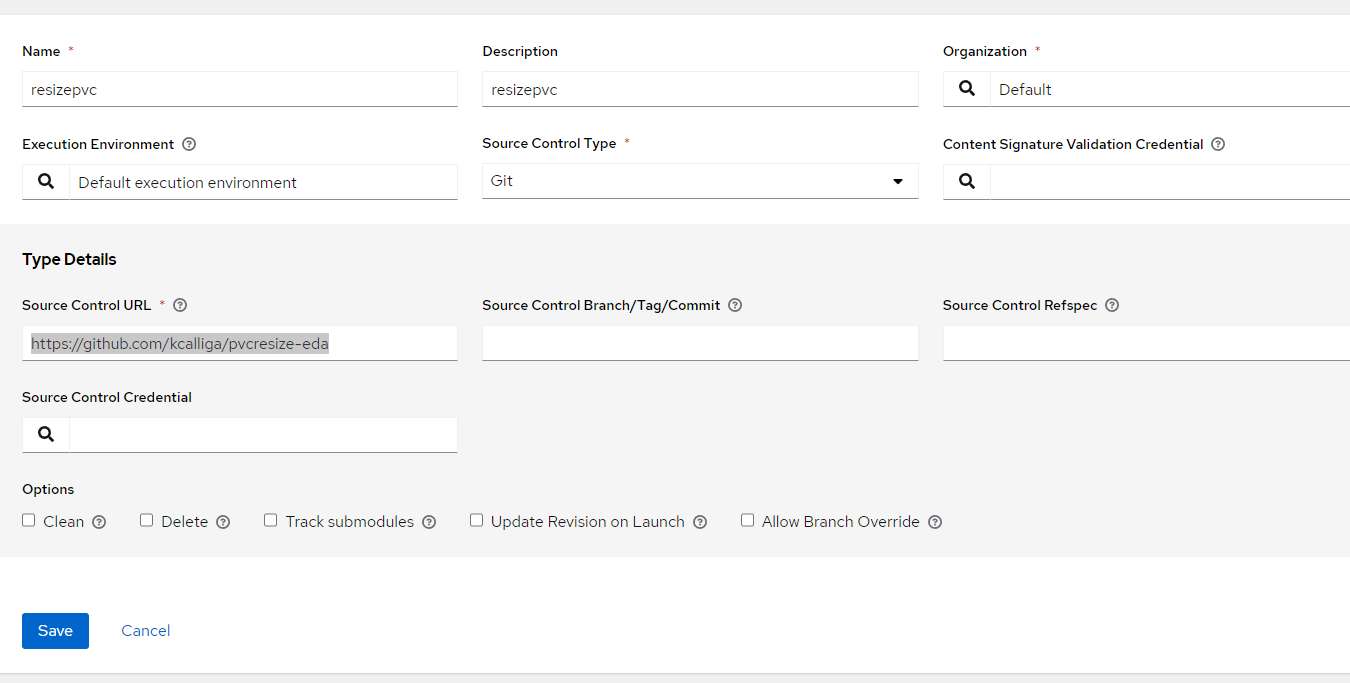
Click "Save"
2. Create Job Template
Under Templates --> Job Template
Name: Resize PVC
Description: Resize PVC
Job Type: Run
Inventory: Demo Inventory
Project: resizepvc
Execution Environment: Default
Playbook: playbooks/pvcresize.yaml
Variables: Be sure to check Prompt on Launch
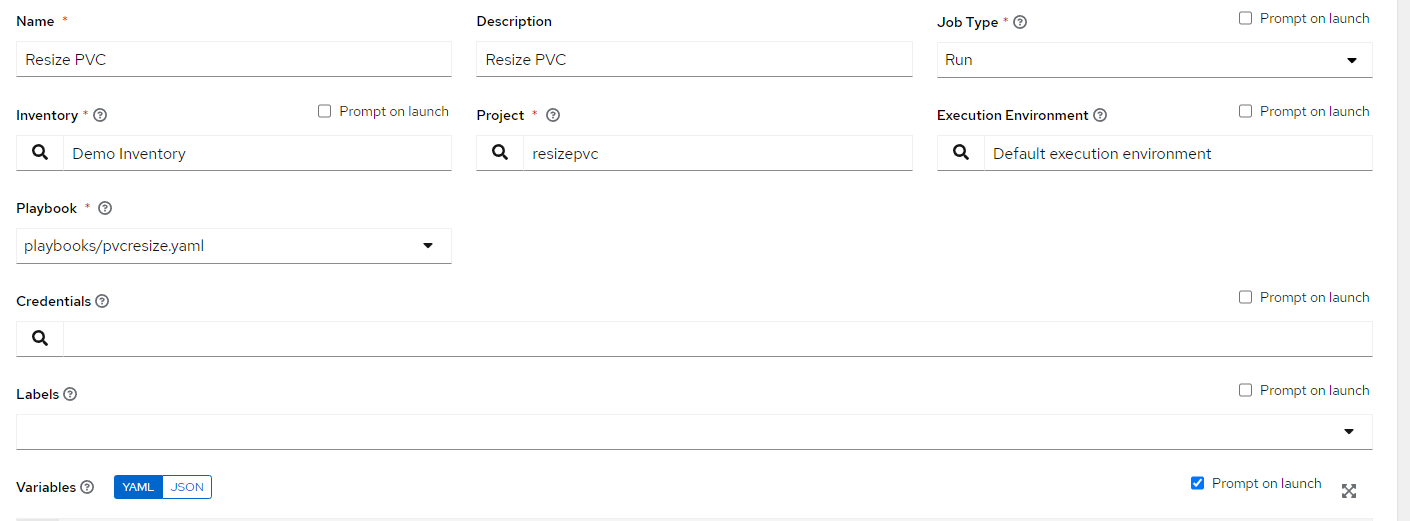
Click "Save"
Sending Sample.JSON Alert
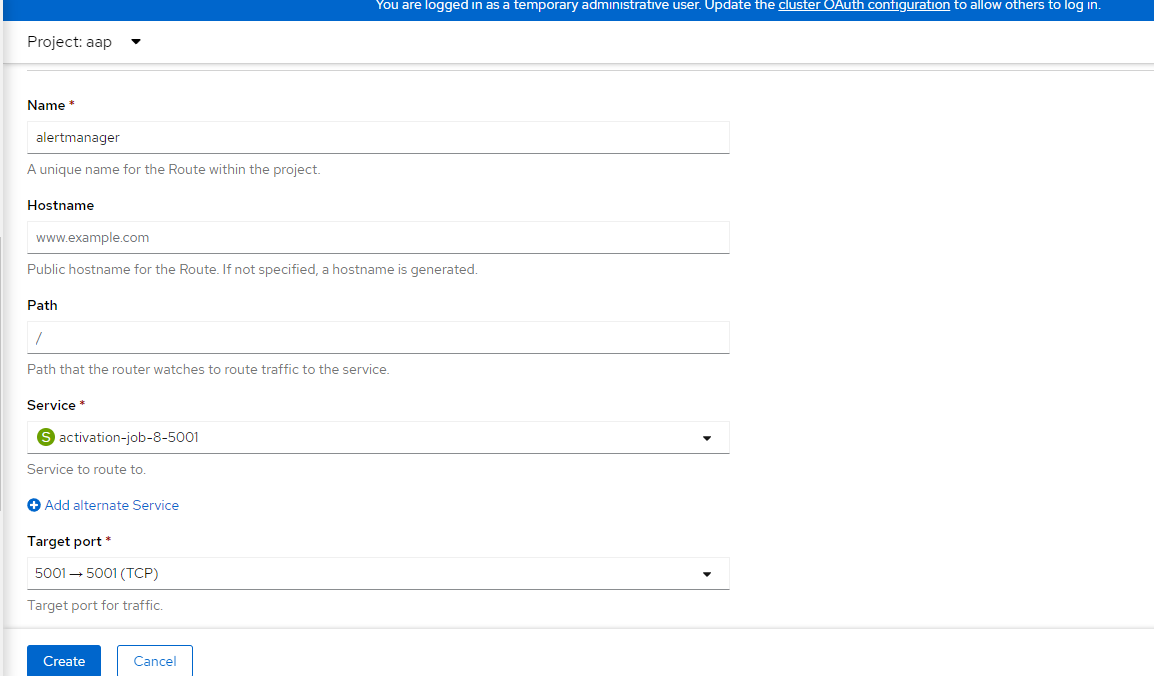
- Create a route in OCP.
Networking --> Routes
Project: aap
Name: alertmanager
Service: activation-job-<somenumber>
Target Port: 5001
2. Send sample.json file. Sample also at https://github.com/kcalliga/pvcresize-eda/blob/main/payload/sample.json
{
  "receiver": "sms",
  "status": "firing",
  "alerts": [
    {
      "status": "firing",
      "labels": {
        "alertname": "ProbeFailure",
        "instance": "https://server.example.org",
        "job": "http_checks",
        "monitor": "master",
        "severity": "critical"
      },
      "annotations": {
        "description": "Instance https://server.example.org has been down for over 5m. Job: http_checks",
        "summary": "BlackBox Probe Failure: https://server.example.org"
      },
      "startsAt": "2023-02-06T13:08:45.828Z",
      "endsAt": "0001-01-01T00:00:00Z",
      "generatorURL": "http://prometheus.example.org:9090/graph?g0.expr=probe_success+%3D%3D+0\\u0026g0.tab=1",
      "fingerprint": "1a30ba71cca2921f"
    }
  ],
  "groupLabels": {
    "alertname": "ProbeFailure"
  },
  "commonLabels": {
    "alertname": "ProbeFailure",
    "instance": "https://server.example.org",
    "job": "http_checks",
    "monitor": "master",
    "severity": "critical"
  },
  "commonAnnotations": {
    "description": "Instance https://server.example.org has been down for over 5m. Job: http_checks",
    "summary": "BlackBox Probe Failure: https://server.example.org"
  },
  "externalURL": "http://prometheus.example.org:9093",
  "version": "4",
  "groupKey": "{}/{severity=\"critical\"}:{alertname=\"ProbeFailure\"}",
  "truncatedAlerts": 0
}
3. On command line with access to OCP cluster, run the following command while changing the FQDN names to match your environment:
curl -i -H "Host: alertmanager-aap.apps.<redacted>" -H "Content-Type: application/json" --request POST --data @sample.json http://alertmanager-aap.apps.<redacted>/send4. On EDA, lets look at RuleBook activations
Rulebook Activations --> resizepvc -->history --> <somenumber>-resizepvc

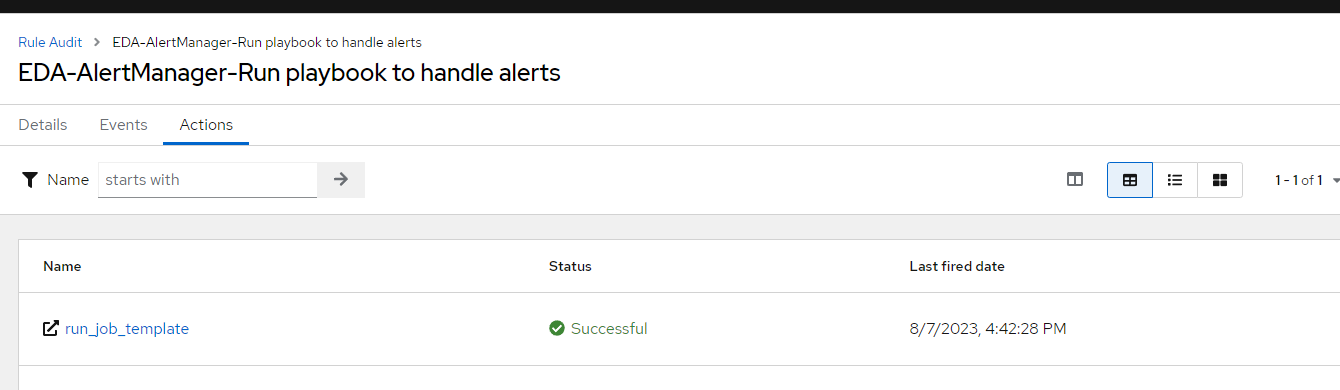
5. Now, let's look at rule audits

Looking at more details, we see that run job template was succesful
Now, we see the variables exposed on the Ansible controller
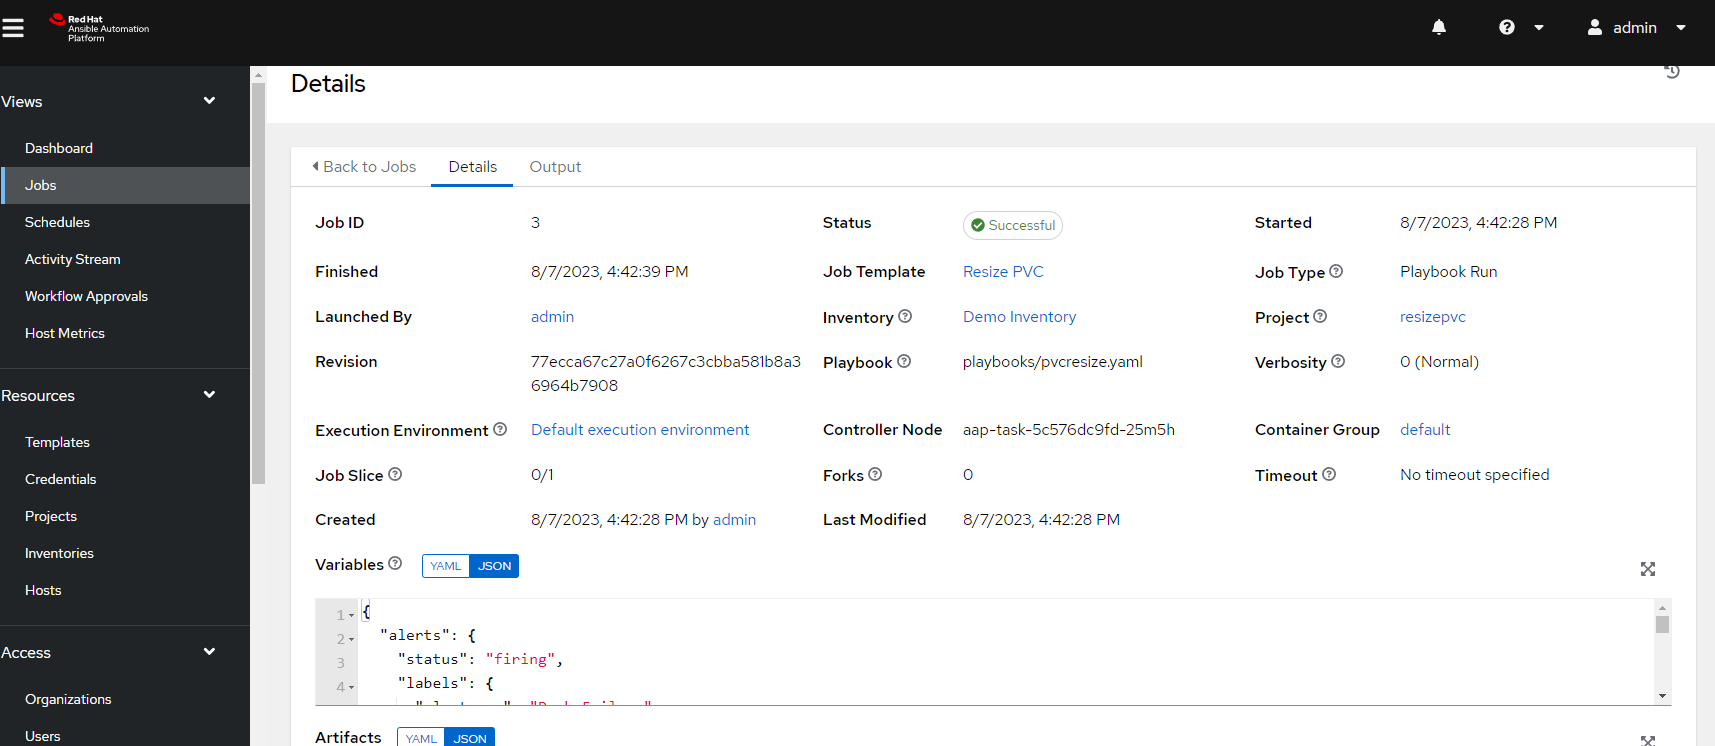
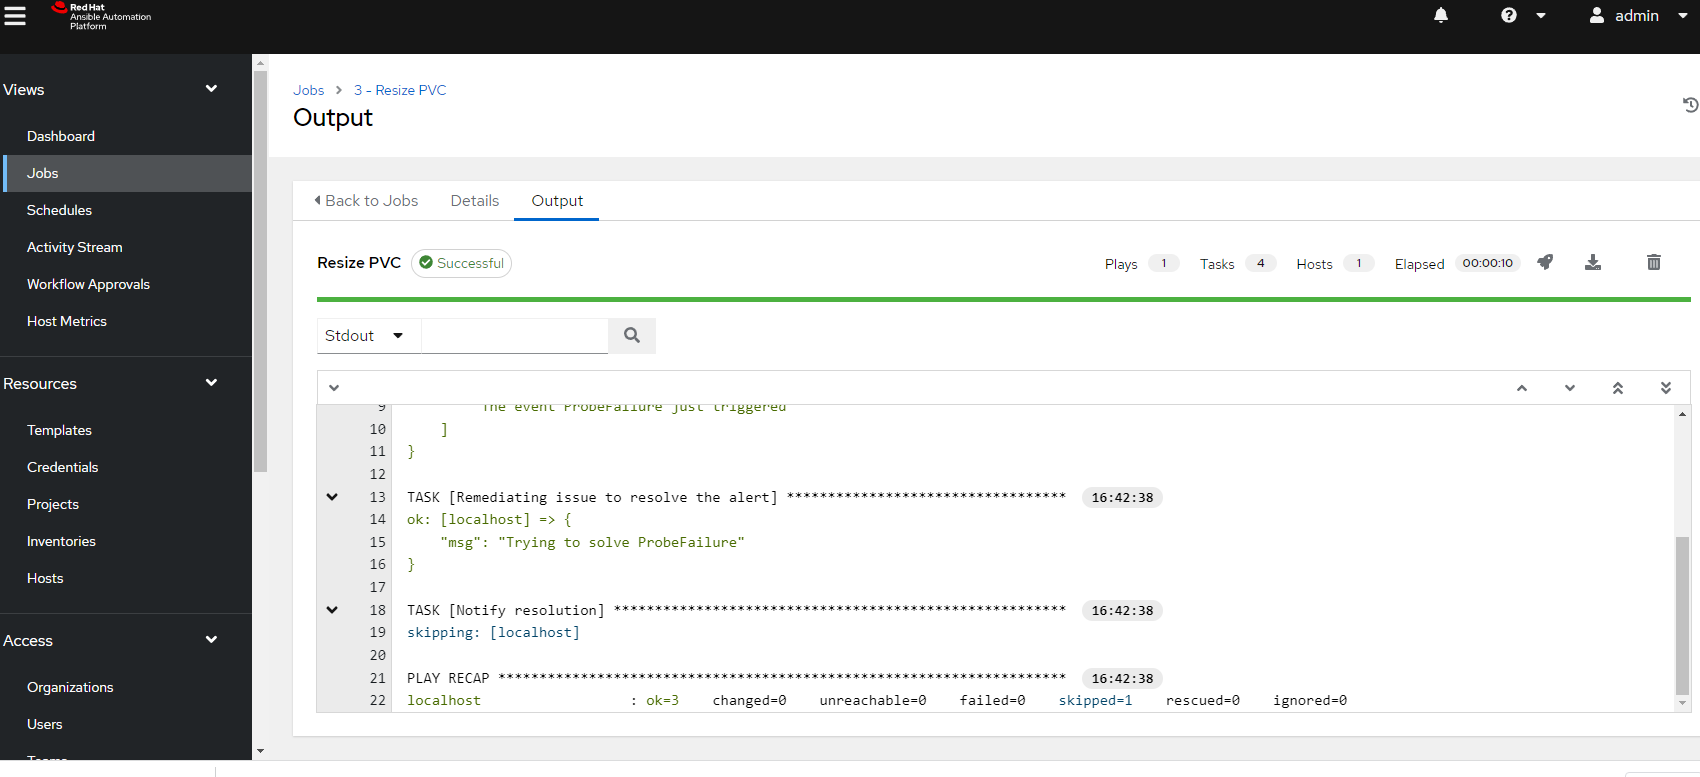
And the output shows a successful playbook run
There is a lot more to do with this in the next parts but this will get us started.
My thanks go out to the Ansible team at Red Hat for helping me through this.