
Example of Deploying a Windows VM from a Template Using Openshift Virtualization

In this post, a Windows 2019 server will be imported into Openshift Virtualization. Step-by-step instructions will show the entire process to include:
- Enabling Nested Virtualization
- Creating the Windows VM inside of Qemu/KVM.
- Installing the Openshift Virtualization Operator
- Deploying the HostPath Provisioner since there is no other persistent storage (such as ODF or local storage operator) on this cluster.
- Deploying the HyperConverged Custom Resource Definition.
- Adding the QCOW boot source to the Windows 2019 Server template.
- Creating the Windows VM from the template
These processes were tested in OCP 4.9 and 4.10. This demonstration occurred on an OCP 4.9.35 SNO (single-node) cluster.
Enabling Nested Virtualization on SNO VM
Since this SNO cluster was deployed using Qemu/KVM, some modifications needed to be made to allow Kubelet to discover this node as a KVM enabled node. If your cluster is bare-metal, these steps will not be needed.
- In virtualization-manager, host-passthrough mode needed to be enabled under CPU properties.

2. A machine-config file would need to be created to enable nested virtualization on KVM. My physical server is AMD-based so the machine-config file will be slightly different.
3. The Butane tool will be used to create the machine-config file. The steps to install Butane are located at https://docs.openshift.com/container-platform/4.9/installing/install_config/installing-customizing.html#installation-special-config-butane-install_installing-customizing
cd /usr/local/bin;

curl https://mirror.openshift.com/pub/openshift-v4/clients/butane/latest/butane --output butane;

chmod +x /usr/local/bin/butane;
4. The Kernel modules to be enabled vary based on the whether the CPU is Intel or AMD based. In this specific case, the hardware is AMD-based.
For AMD (file saved as 50-master-nested-kvm-amd.bu):
variant: openshift
version: 4.9.0
metadata:
  name: 50-master-nested-kvm-amd
  labels:
    machineconfiguration.openshift.io/role: master
storage:
  files:
  - path: /etc/modprobe.d/kvm-amd.conf
    mode: 0644
    overwrite: true
    contents:
      inline: |
        options kvm_amd nested=1
For Intel (file saved as 50-master-nested-kvm-intel.bu):
variant: openshift
version: 4.9.0
metadata:
  name: 50-master-nested-kvm-intel
  labels:
    machineconfiguration.openshift.io/role: master
storage:
  files:
  - path: /etc/modprobe.d/kvm-intel.conf
    mode: 0644
    overwrite: true
    contents:
      inline: |
        options kvm_intel nested=1
5. Run the following command to generate the machine-config based on corresponding (AMD or Intel) Butane file.
butane 50-master-nested-kvm-amd.bu -o 50-master-nested-kvm-amd.yaml6. Now, apply the machine-config
oc apply -f 50-master-nested-kvm-amd.yaml7. Once this is applied, the node will reboot.
8. To verify that these settings were applied, run the following command on the RHCOS node:
# for AMD
cat /sys/module/kvm_amd/parameters/nested
# for Intel
cat /sys/module/kvm_intel/parameters/nested
The output should be "1" for enabled.
Creating the Windows VM Inside Qemu/KVM
I downloaded the Windows ISO from https://www.microsoft.com/en-us/evalcenter/download-windows-server-2019
Once it was downloaded, I created a VM. One issue I encountered previously with attempting to install a Windows VM directly into Openshift Virtualization had to do with the VirtIO drivers. By installing/creating the Windows Server 2019 VM in Qemu/KVM first, this issue did not occur.
According to Microsoft, Windows Server 2019 needs the following hardware requirements:
1.4 Ghz Processor
512 MB of RAM
32 GB Disk
I was specifically looking for the minimum storage requirements which is 32GB. This would tell me the size of the QCOW image that will later be imported. Creating this QCOW with this minimum storage size will result in a faster upload and make this as portable as possible.
Installing Qemu/KVM and creating a Windows Server 2019 VM are out of scope for this document. Basically, I did a basic install of Windows Server 2019, installed updates, and then shut it down.
The resulting QCOW image (/var/lib/libvirt/images/<VMName.qcow>) was used in the in part 6 of this document (Importing the QCOW boot source into the Windows Server 2019 template).
Installing the Openshift Virtualization Operator
1. In the Openshift Web Console, go to Operators --> OperatorHub
2. Search for Virtualization
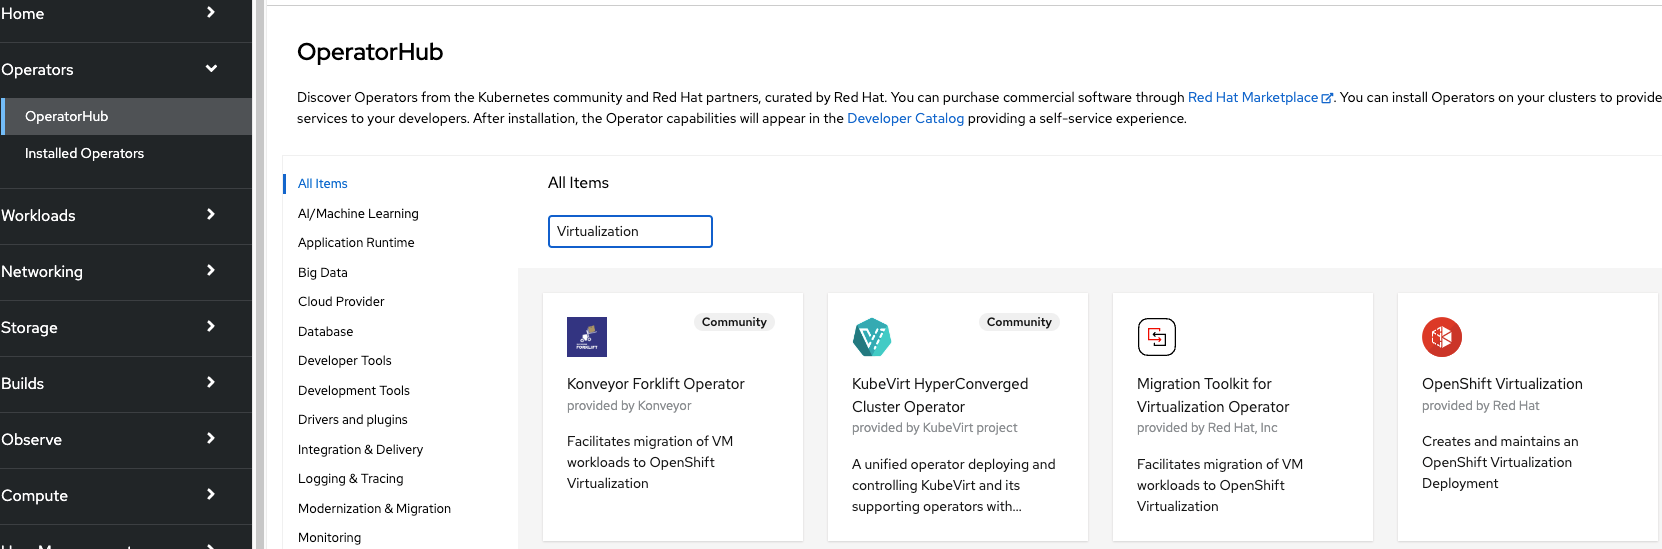
3. Select "Openshift Virtualization"
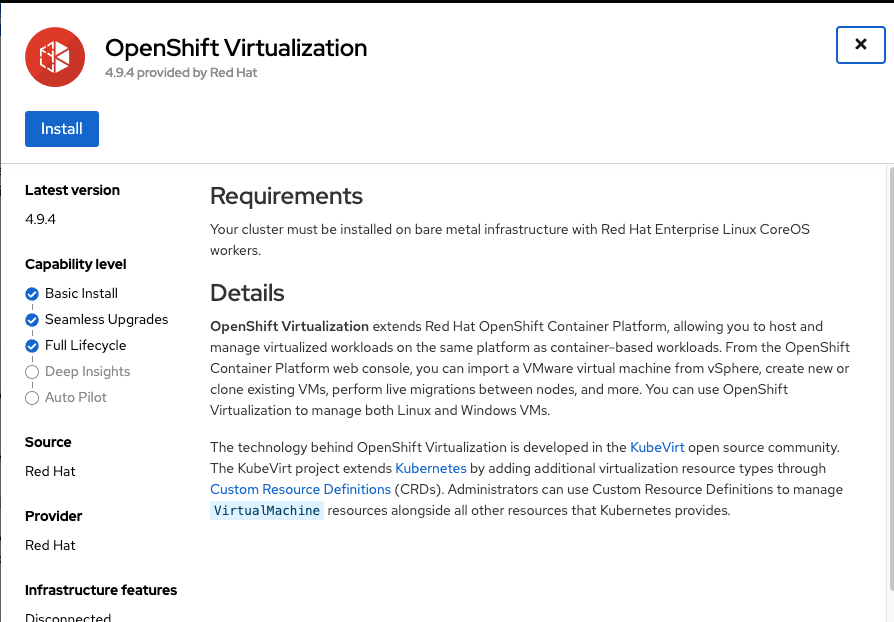
4. On the first screen, select "Install"
5. On the next screen, the default options are sufficient. This will mean that the stable version will be installed and the "openshift-cnv" project/namespace will be created. Disregard the warning in this screenshot about namespace previously existing.
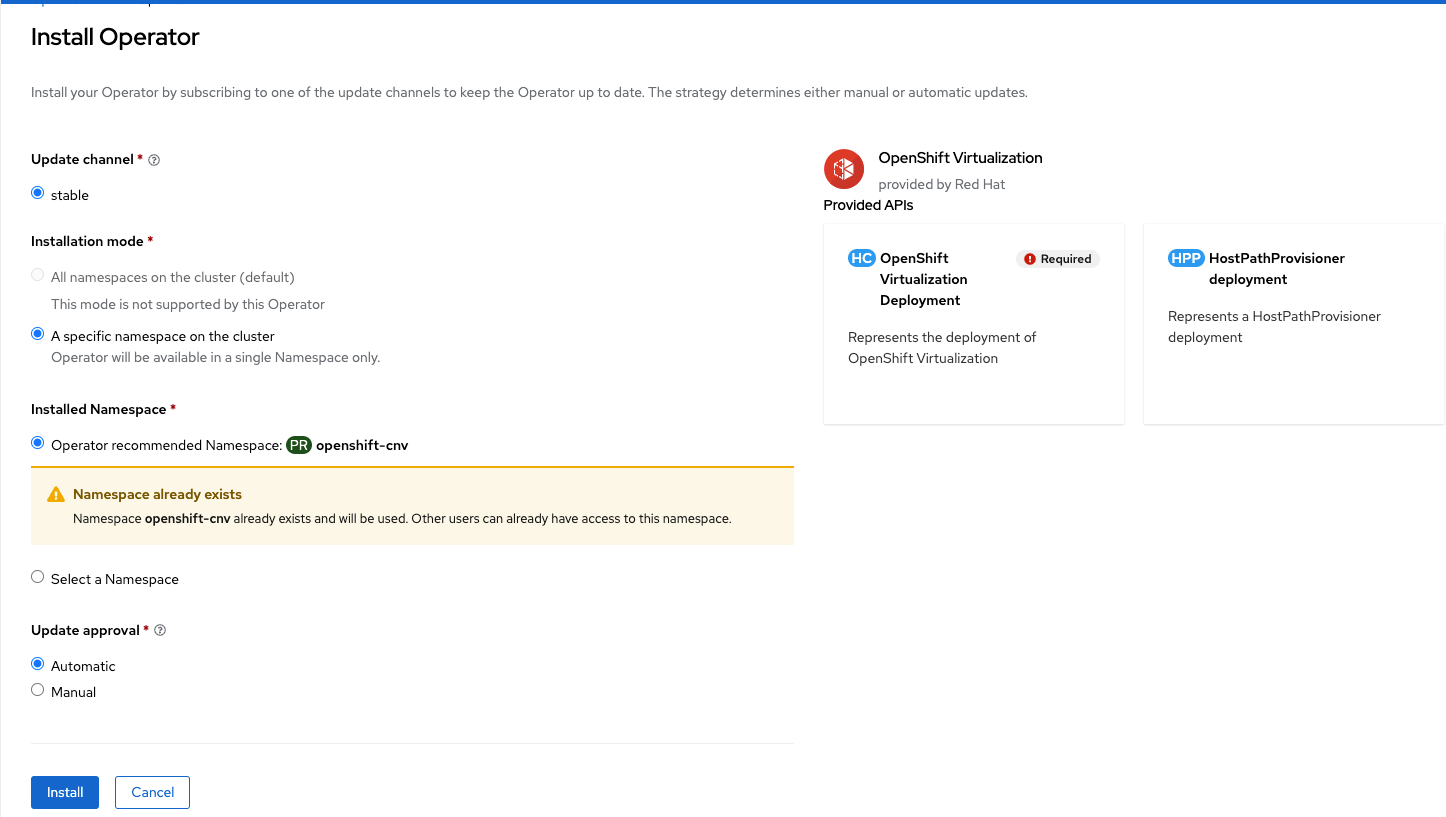
Click "Install"
The screen also indicates that the Openshift Virtualization Deployment/HC and HostPath Provisioner Deployment/HPP will be added to the API. These will be used in the coming steps.
6. The final confirmation screen should soon appear that provides the option to "Create HyperConverged". Do not complete this step yet.
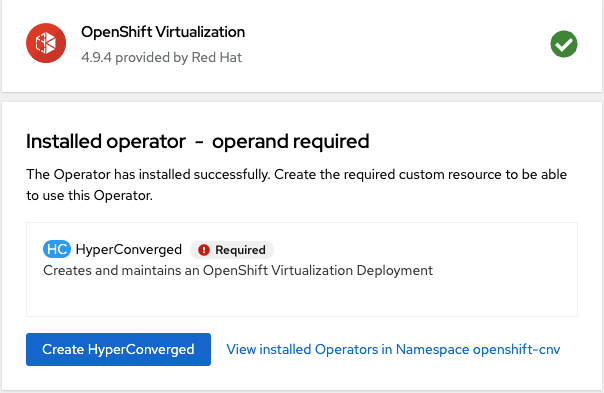
We will need to deploy/define the HostPath Provisioner resource next.
Deploying HostPath Provisioner
In this test-case, there is no persistent storage such as ODF (Openshift Data Foundations) or LSO (Local Storage Operator), so a HostPath on each node that will run virtualization workloads needs to be defined.
Prior to performing these steps, it is necessary to SSH into each node that will run virtualization workloads and create a directory. In this case, /var/hpvolumes was used. A secondary disk can be used or the primary root disk can be used. If the primary root disk is used, it is recommended to install OCP on a partition larger than the minimum requirement of 120GB. I used 500GB in my environment to account for any persistent volumes that would be created as a result of the boot source, scratch-space, clones, etc.
Once the /var/hpvolumes directory was created, the following YAML files were applied to the cluster.
The first one is a machine-config that will create a SystemD unit to add the proper SELinux context to the /var/hpvolumes directory. Since my cluster is SNO, I used the master role to apply this machine-config.
50-machine-hostpath.yaml
apiVersion: machineconfiguration.openshift.io/v1
kind: MachineConfig
metadata:
  name: 50-set-selinux-for-hostpath-provisioner
  labels:
    machineconfiguration.openshift.io/role: master
spec:
  config:
    ignition:
      version: 3.2.0
    systemd:
      units:
        - contents: |
            [Unit]
            Description=Set SELinux chcon for hostpath provisioner
            Before=kubelet.service

            [Service]
            ExecStart=/usr/bin/chcon -Rt container_file_t /var/hpvolumes

            [Install]
            WantedBy=multi-user.target
          enabled: true
          name: hostpath-provisioner.service
The node(s) in the cluster will reboot after applying this machine-config. Once the reboot is finished, SSH into the node(s) and verify that SystemD unit did not fail and the proper SELinux context is applied to the /var/hpvolumes directory.
ls -laZ /var/hpvolumes
The output should show the "unconfined_u:object_r:container_file_t:s0" context on the directory as shown in the output below.

The next YAML that needs to be applied is the HostPath Provisioner resource. This defines the /var/hpvolumes directory will be used.
hostpath-provisioner.yaml
apiVersion: hostpathprovisioner.kubevirt.io/v1beta1
kind: HostPathProvisioner
metadata:
  name: hostpath-provisioner
spec:
  imagePullPolicy: IfNotPresent
  pathConfig:
    path: "/var/hpvolumes"
    useNamingPrefix: false
  workload:
Lastly, the storage class for the HostPath Provisioner needs to be created to dynamically provision persistent volumes that will be used for bootsource, virtual machines, clones, scratch-space, etc.
hostpath-storageclass.yaml
apiVersion: storage.k8s.io/v1
kind: StorageClass
metadata:
  name: hostpath-provisioner
provisioner: kubevirt.io/hostpath-provisioner
reclaimPolicy: Delete
volumeBindingMode: WaitForFirstConsumer
Now is the time to deploy the HyperConverged object.
Deploying HyperConverged Custom Resource Definition
- In the Openshift Web Console, go to "Installed Operators" --> "Openshift Virtualization" and click "Create HyperConverged"

2. The only change that is being made on the default options for installing Hyperconverged is defining the storageclass that will be used. In this case, it is called "hostpath-provisioner"
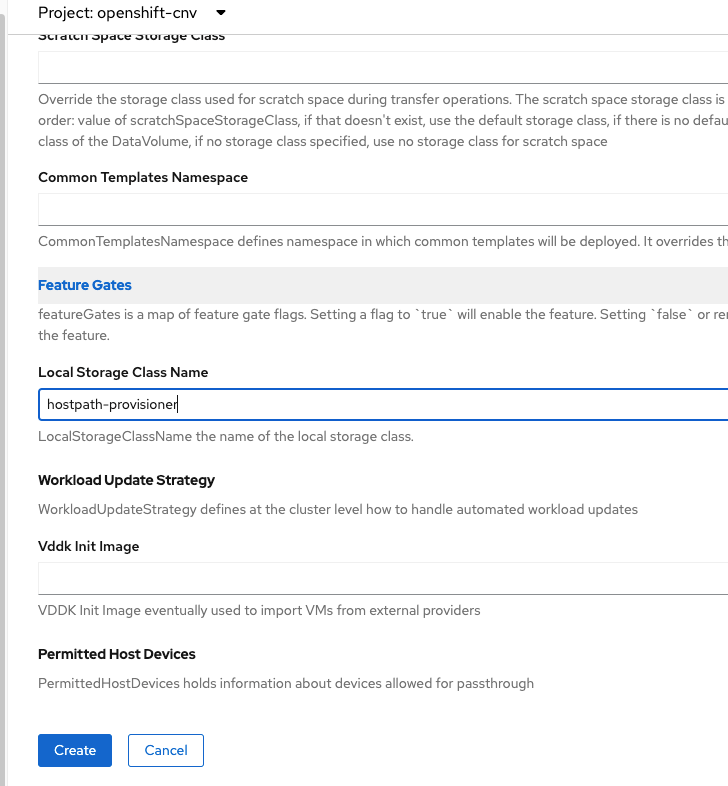
3. Click "Create"
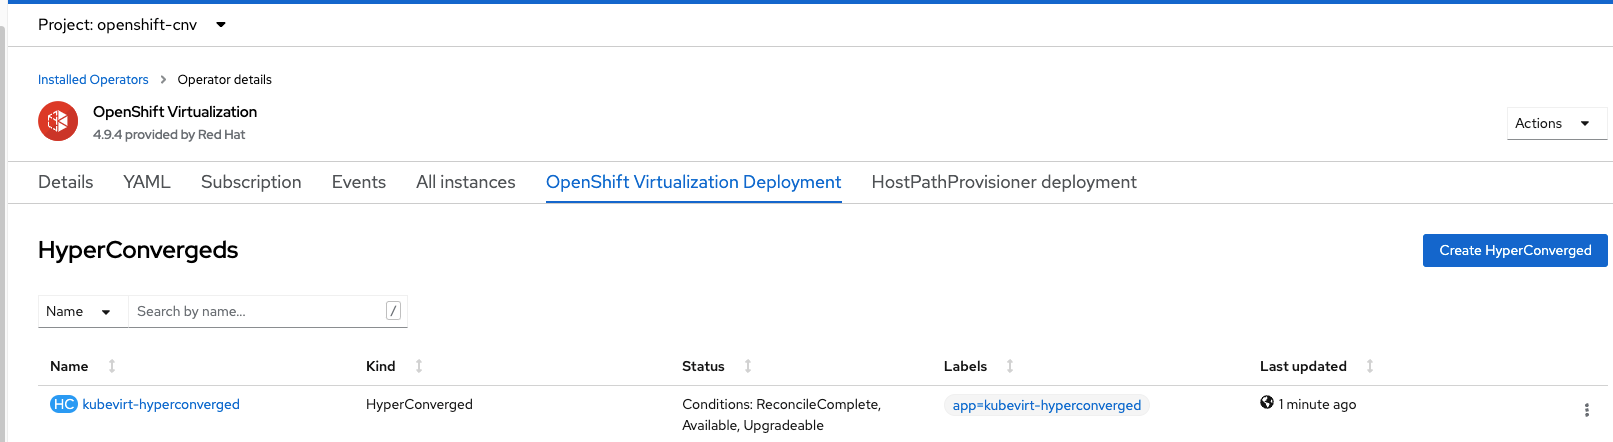
4. On the resulting screen, wait for HyperConverged to show a status as "Available" as shown in the screenshot below.
Now, it's time to add the QCOW Windows image that was created earlier as a template bootsource.
Adding the QCOW Boot Source to Windows Server 2019 Template
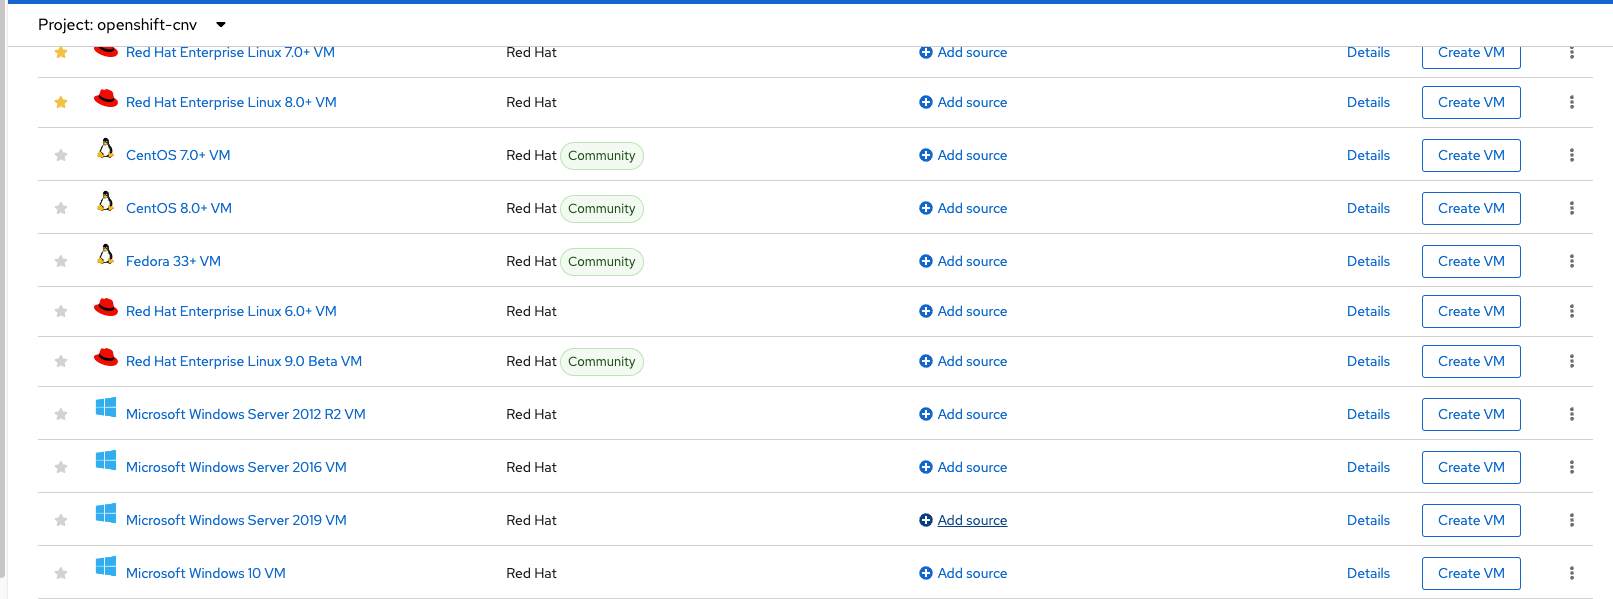
- On the Openshift Web Console, go to Workloads --> Virtualization (on 4.9). On 4.10, there is a separate menu for virtualization. Click on "Templates". If the menu does not appear, refresh your web browser since the web console would need to be refreshed to show these new menus.
Look for "Microsoft Windows Server 2019 VM" and click on "Add Source"
You'll want to be connected to a high speed Internet or be on the same network as your OCP to upload the 32GB QCOW. Otherwise, it will be very slow.
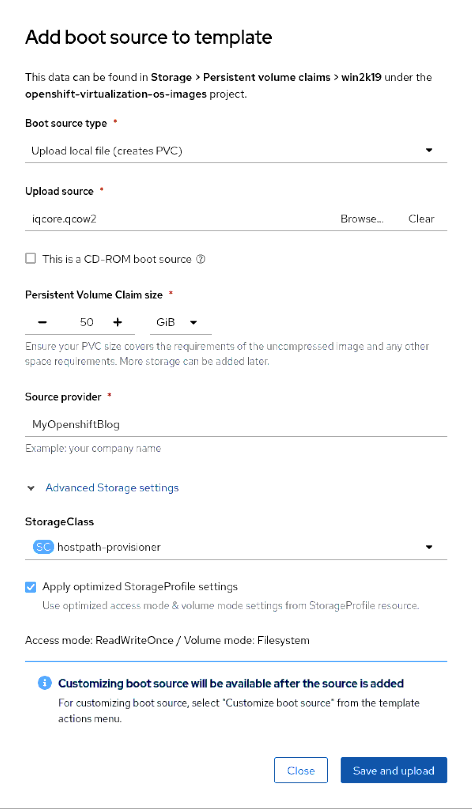
2. On the "Add Source" screen:
-Upload local file and choose the qcow image (iqcore.qcow2) in this example.
-For persistent storage claim size, I used 50GB because this was the how the original image was created but you can probably use 35GB. The image can be resized when a VM is instantiated from this template.
-Service Provider can be anything you want
-For StorageClass, I am using the "hostpath-provisioner"
See screenshot below
Persistent volumes will be created and the image will be uploaded as shown in the screenshot below
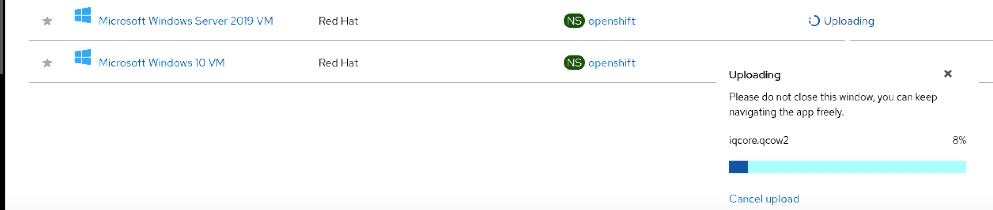
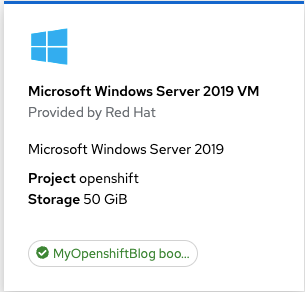
Wait for the status to be completed and for the boot source to become available before continuing. The status will eventually change to the name of the bootsource provider which is MyOpenshiftBlog (in this case).
Now it is time to create the Windows VM from this template.
Creating the Windows VM from the Template
- Go to Virtualization --> Create Virtual Machine in the Openshift Web Console.
- The template and bootsource will be available. Select this one.
3. Click "Next". For simplicity sake, all default options (with exception of adding SSH key) were used.
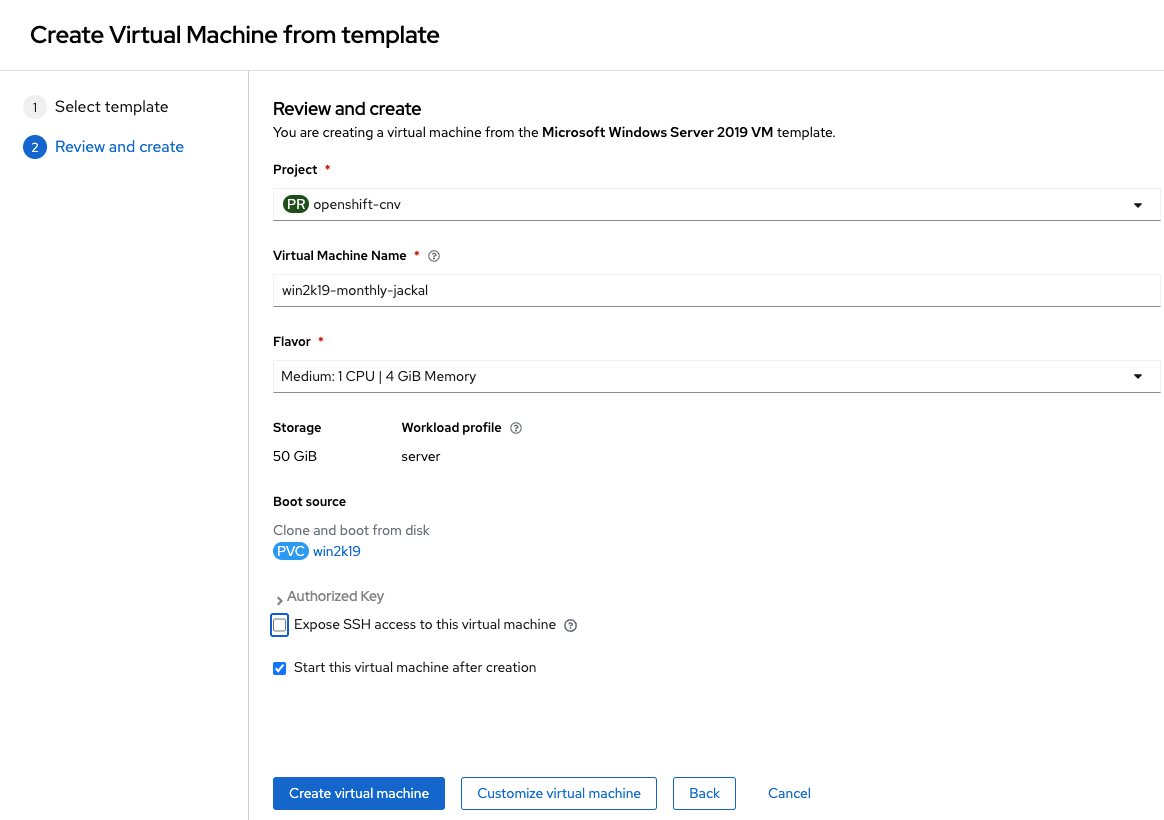
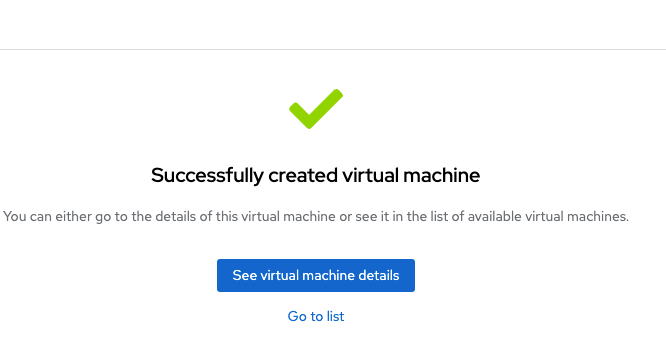
4. Click "Create Virtual Machine"
5. Click on "See virtual machine" details to view status.
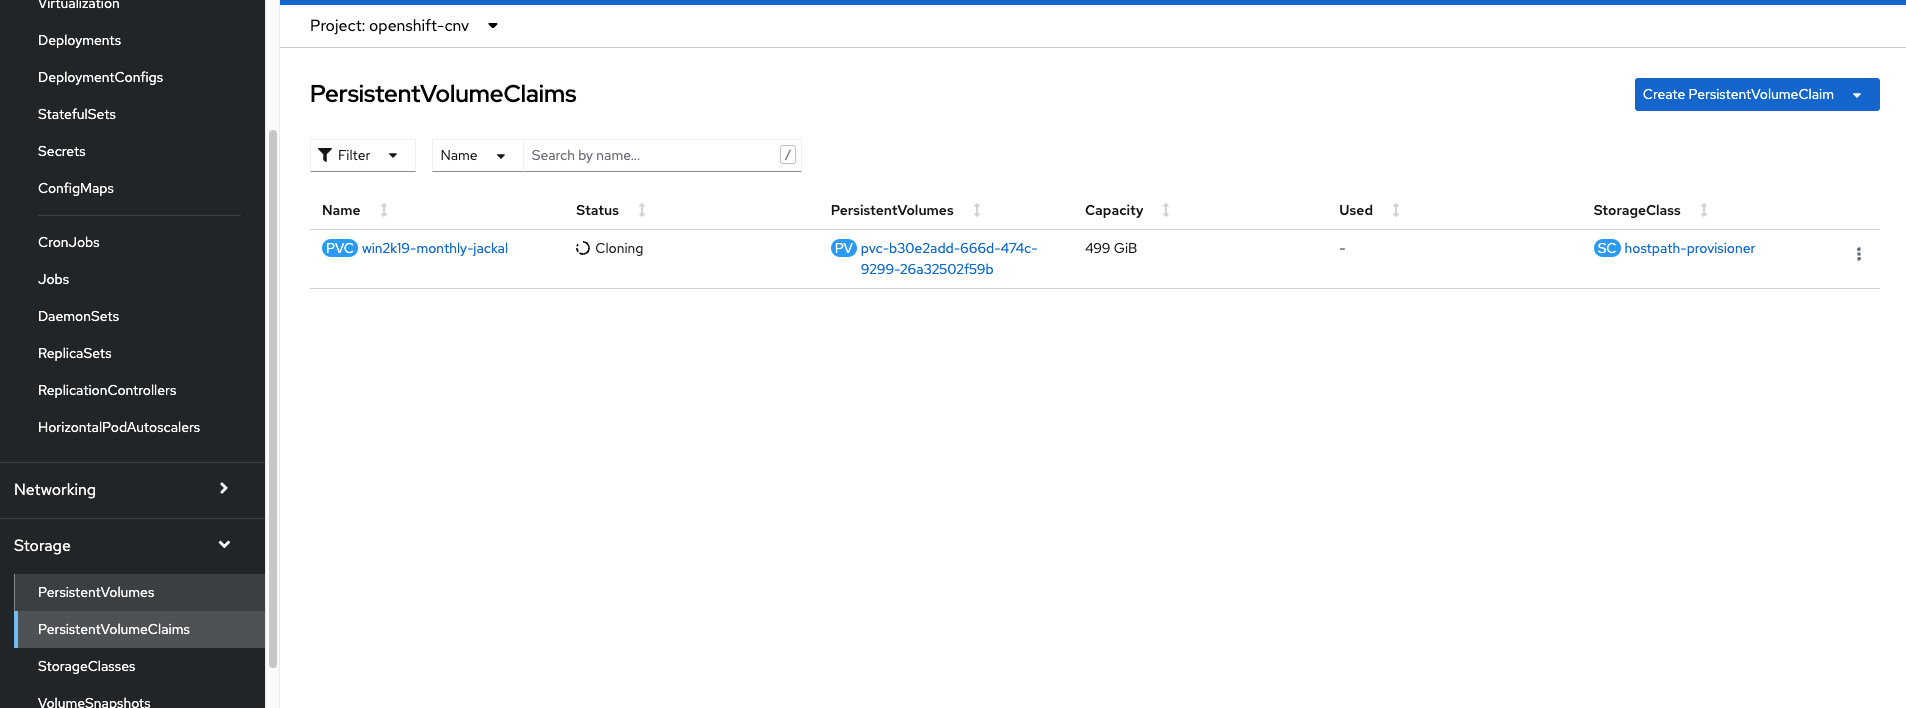
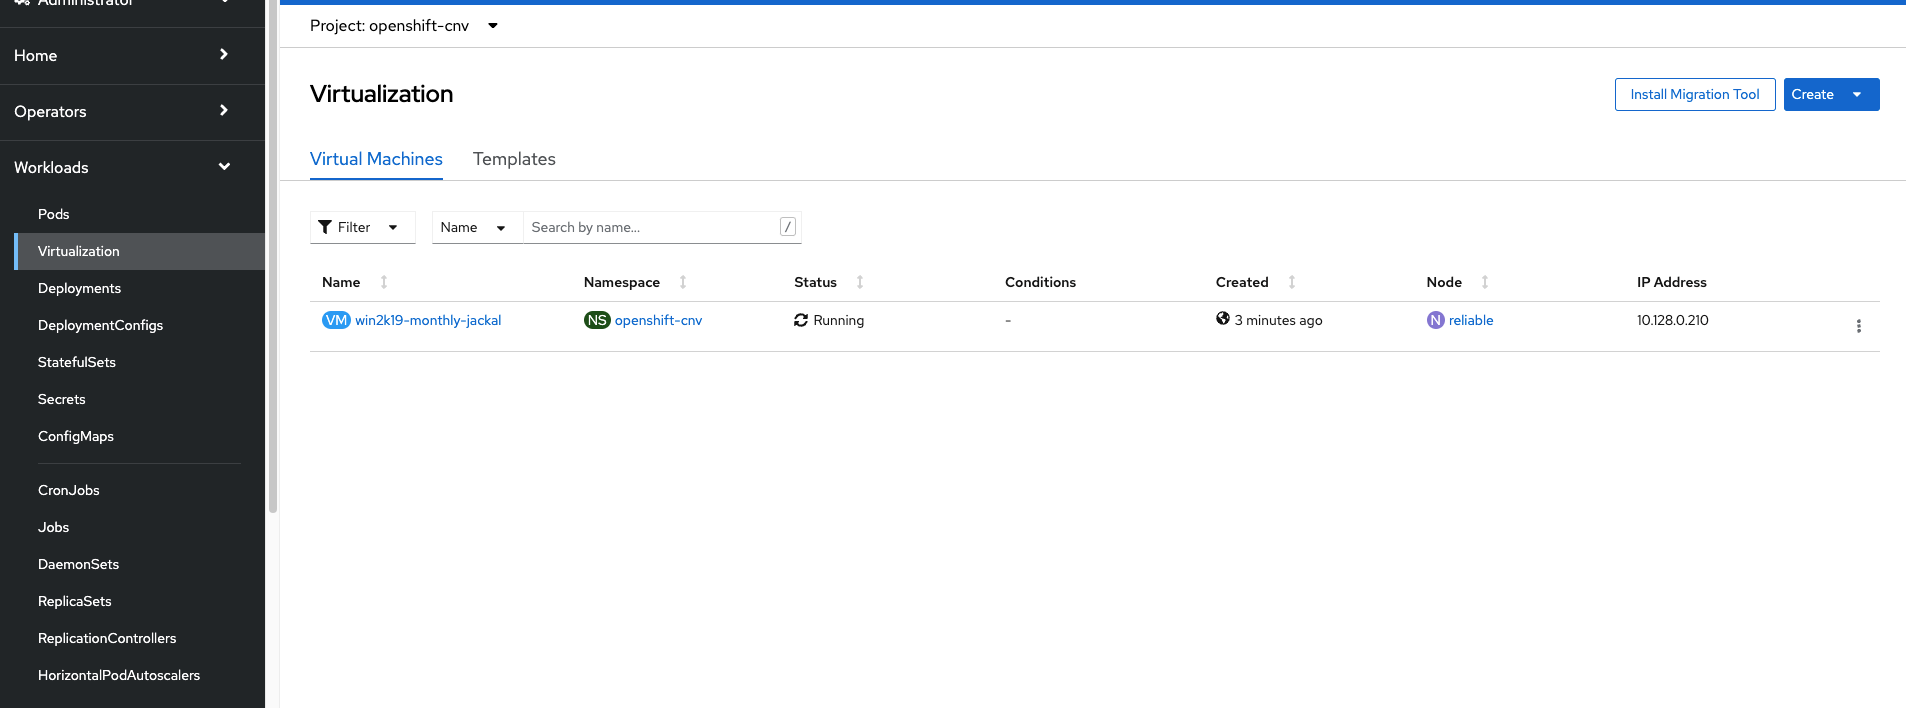
As a result of the VM creation from template with boot source, a few things happen in the background:
A. PVC and pod is created to clone the original boot source to new persistent volume. The PVC will show a "cloning" status.
B. Once the clone is finished, the VM will start-up
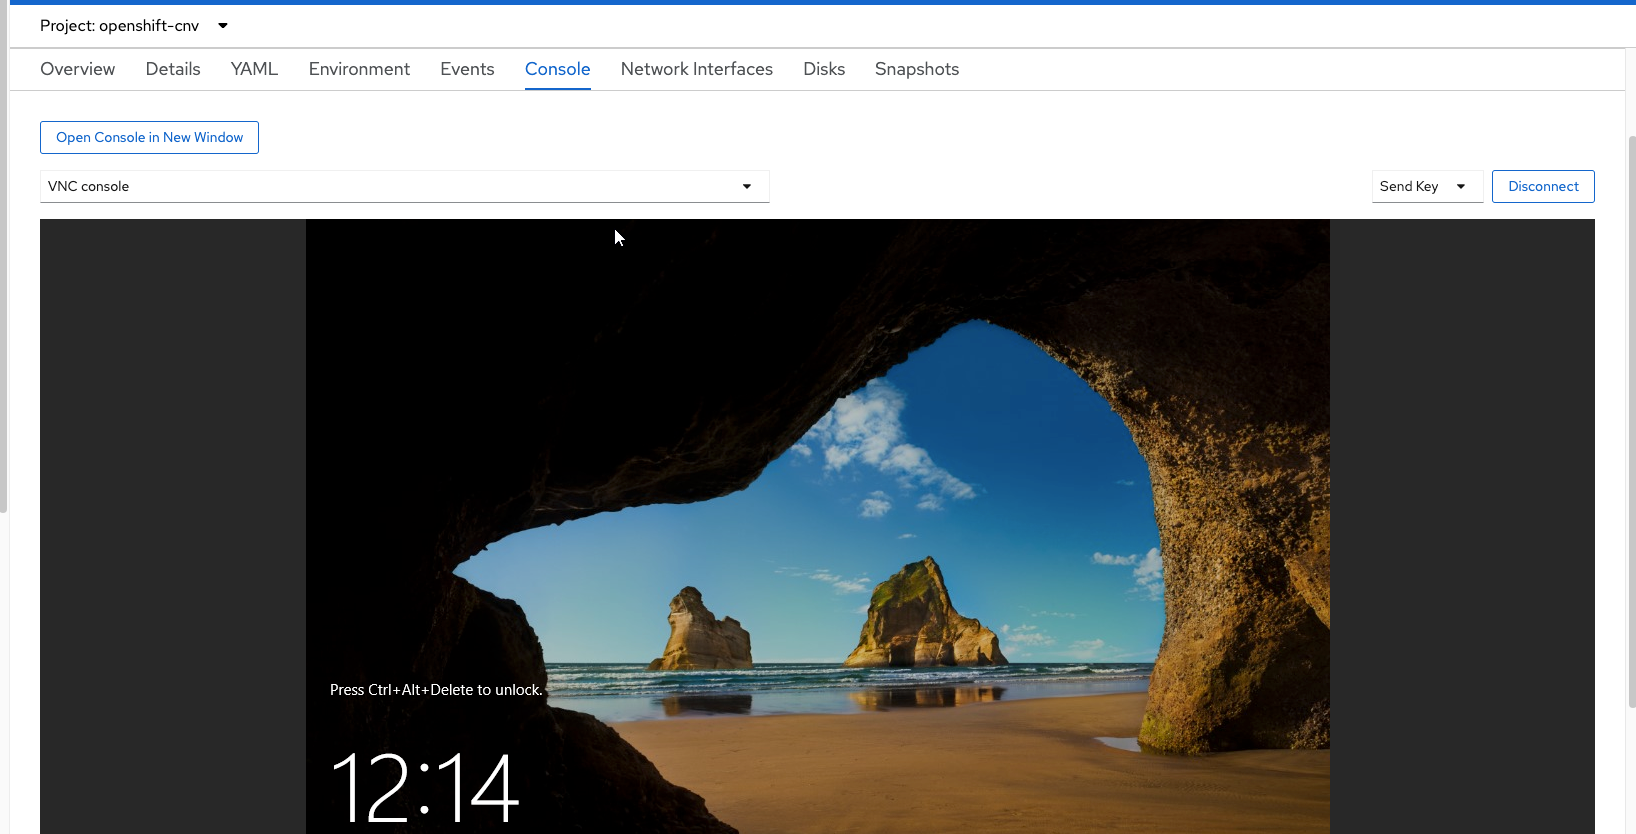
C. When clicking on the VM and viewing the console, the Windows login screen should appear.
I hope you enjoyed this article. Many more articles to come.